Marine fire door seals are small components that cause massive headaches during project handovers if they fail.
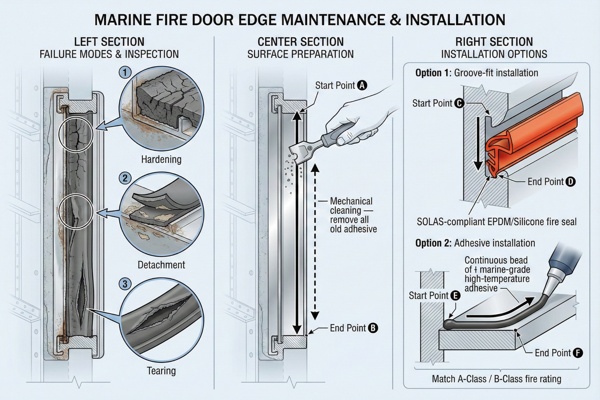
The process for repairing damaged marine fire door seals involves a systematic approach: accurately assessing the specific damage type (hardening, detachment, or tearing), selecting a SOLAS-compliant material (typically EPDM or Silicone) that matches the door's A or B-Class rating, mechanically cleaning the substrate to remove all old adhesive residue, and installing the new profile using either a groove-mount method or high-temperature marine-grade adhesive.
Many procurement officers and shipyard managers overlook the rubber seal until the surveyor points a flashlight through the gap. A failed seal means a failed fire door, and a failed fire door means the vessel cannot be delivered. Replacing a door frame is expensive and destroys the surrounding interior decoration. Replacing the seal is a low-cost, high-skill operation that saves the schedule. I have seen projects in Europe delayed by weeks simply because the replacement seals ordered from Asia were the wrong profile or lacked the correct fire certificate. This guide breaks down exactly how to fix this issue correctly and economically.
How to identify common types of marine fire door seal damage?
Identifying the specific failure mode is the first step to ensuring the new seal lasts longer than the old one.
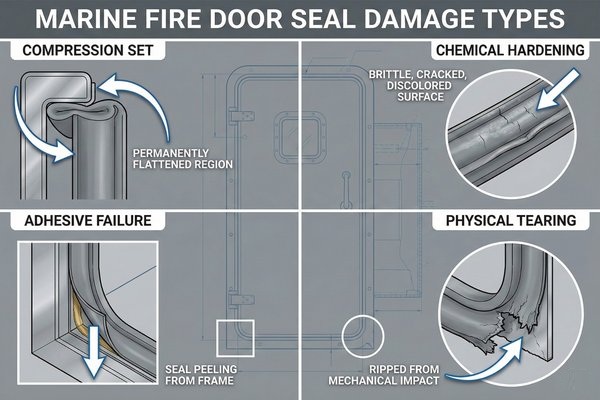
Common marine fire door seal damage falls into four distinct categories: Compression Set (permanent flattening where the seal no longer rebounds), Chemical Hardening (brittleness caused by UV or cleaning agents), Adhesive Failure (detachment from the steel frame due to poor surface prep), and Physical Tearing (mechanical damage from heavy traffic or cargo impacts).
Analyzing Material Degradation: Compression Set and Chemical Hardening
When we look at why seals fail over time, we are usually looking at two specific chemical processes mentioned in the snippet: Compression Set and Chemical Hardening.
First, Compression Set is the most common issue on older vessels or doors stored improperly. This occurs when the rubber polymer chains physically realign and lose their "memory." You can identify this easily: open the door and inspect the seal. If the seal remains flattened like a piece of tape rather than rebounding to its original bulb or P-shape, it suffers from compression set. According to ISO 815 standards1, a marine seal is considered failed if it recovers less than 80% of its original height. A flattened seal cannot fill the gap between the door and the frame, meaning smoke will pass through instantly during a fire.
Second, Chemical Hardening is a different beast, often caused by the environment. I frequently see this in hospital ships, galleys, or sanitary spaces where the crew uses aggressive cleaning agents like bleach or heavy solvents. These chemicals leach the plasticizers out of the rubber. Over time, the seal becomes rock hard. To identify this, pinch the rubber seal between your fingernails. A healthy seal is soft and yielding. A chemically hardened seal will feel like hard plastic and may show "spiderweb" micro-cracks on the surface. If you pinch it hard, it might even crumble. This is dangerous because, in a fire, the heat will cause this brittle rubber to disintegrate immediately rather than swelling to seal the gap.
Diagnosing Mechanical and Installation Failures: Adhesive Issues and Tearing
While degradation takes time, the other two categories—Adhesive Failure and Physical Tearing—are structural or mechanical issues that can happen at any time.
Adhesive Failure typically manifests as the seal hanging loose from the frame, often resembling "spaghetti." As a procurement officer or engineer, you need to look at where the failure happened. Inspect the back of the loose rubber. If the glue is stuck to the rubber but the steel frame is clean, the failure was caused by poor surface preparation—likely oil, dust, or moisture on the steel when the seal was installed. This is a process failure. However, if the glue is on the frame but the rubber is clean, the rubber itself may not have been primed correctly. This distinction is vital because it tells you whether you need to buy better glue or train your installers better.
Finally, Physical Tearing is strictly mechanical. This is common in high-traffic areas, such as the entrance to the engine room or provision stores. Unlike the other types, this damage is traumatic: cuts, gouges, or missing chunks of rubber. This is usually caused by cargo pallets, toolboxes, or luggage striking the door frame. While compression set is a slow decline, a tear is an immediate breach of the fire line. A torn seal offers zero resistance to smoke or flames and requires immediate replacement, regardless of the age of the rubber.
| Damage Type | Visual Indicator | Primary Cause | Immediate Risk |
|---|---|---|---|
| Compression Set | Seal remains flat/deformed after door opens. | Low-quality rubber or prolonged pressure. | Smoke leakage in early fire stages. |
| Chemical Hardening | Small spiderweb cracks; breaks when pinched. | UV exposure or harsh cleaning chemicals. | Seal disintegration under heat. |
| Adhesive Failure | Seal hanging loose; exposed adhesive. | Poor surface prep (oil/dust) or moisture. | Total loss of fire integrity. |
| Physical Tearing | Cuts, gouges, or missing chunks. | Impact from cargo, luggage, or tools. | Direct flame path through the gap. |
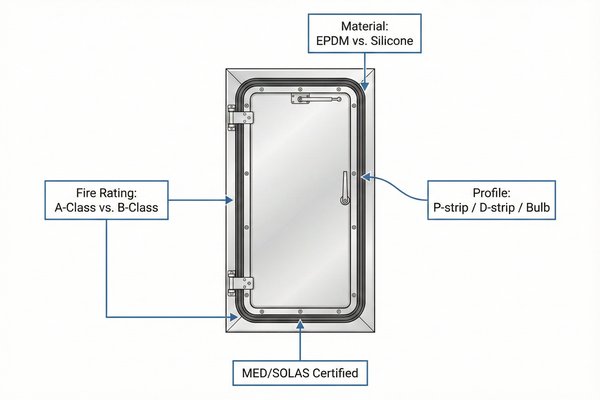
What are the criteria for selecting compliant replacement materials?
Selecting the wrong material can invalidate the fire certificate of the entire door assembly.
The criteria for selecting compliant replacement seals include matching the specific Fire Rating (A-Class vs. B-Class requirements), verifying the Material Composition (EPDM for standard A-60 doors vs. Silicone for extreme temperatures), confirming the Profile Geometry (P-strip, D-strip, or bulb), and ensuring the product holds a valid MED/SOLAS certificate to satisfy class surveyors.
Technical Comparison of Material Composition and Fire Ratings
When selecting a replacement, you must first address the Fire Rating and Material Composition. These two factors are inextricably linked. For standard accommodation areas (cabins, corridors, offices), the requirement is usually for A-60 or B-15 class divisions. In these scenarios, EPDM (Ethylene Propylene Diene Monomer) is the industry standard. It is cost-effective, typically ranging from $1.50 to $3.00 USD per meter. EPDM has excellent resistance to aging and ozone, making it durable for 5-10 years. It typically handles a temperature range of -40°C to +120°C.
However, if you are outfitting technical spaces like engine rooms, incinerator rooms, or heavy galleys, EPDM is insufficient. You must upgrade to Silicone Rubber2. Silicone is significantly more expensive—often $4.00 to $8.00 USD per meter—but it is non-negotiable for high-heat environments. Silicone remains flexible down to -60°C and stable up to +230°C. Furthermore, when Silicone burns, it releases non-toxic white smoke, whereas burning EPDM can release darker, more noxious fumes. A common mistake I see is buyers purchasing EPDM for an engine room door to save money; the ambient heat in the engine room (often 40-50°C continuous) will cause the EPDM to degrade and harden prematurely, leading to failure within a year.
Verification of Profile Geometry and MED Certification
Once the material is chosen, you must match the Profile Geometry. Marine seals are not "one size fits all." The profile—whether it is a P-strip, D-strip, Bulb, or Double-Bulb—dictates the compression ratio. If a door was designed for a 15mm P-strip and you install a 10mm D-strip, you will have a 5mm gap at the top of the door. You must use calipers to measure the gap width and depth of the existing groove (if applicable). A correct fit requires the seal to be compressed by roughly 15-20% when the door is latched.
Finally, and perhaps most importantly for the paperwork, is the MED/SOLAS Certificate. In the marine industry, a product without a certificate essentially does not exist. When sourcing from Asia, you must demand the "Wheelmark" certificate. This document proves that the seal has been tested in accordance with the IMO FTP Code. The surveyor will check this. If you install a generic rubber seal from a hardware store, even if it fits perfectly, the surveyor will force you to rip it out because there is no proof it won't melt instantly at 100°C. Always ensure the certificate explicitly mentions the fire rating (e.g., "Approved for use in A-60 Class Doors").
| Feature | EPDM Rubber (Standard) | Silicone Rubber (Premium) | PVC / Generic Rubber |
|---|---|---|---|
| Temperature Range | -40°C to +120°C | -60°C to +230°C | -10°C to +60°C (Avoid) |
| Fire Behavior | Chars, low smoke. | Main integrity, non-toxic smoke. | Melts, drips, toxic fumes. |
| Profile Precision | Maintains shape well. | High memory/rebound. | Deforms easily. |
| Best Application | Accommodation Cabins. | Engine Rooms, Galleys. | Non-marine use only. |
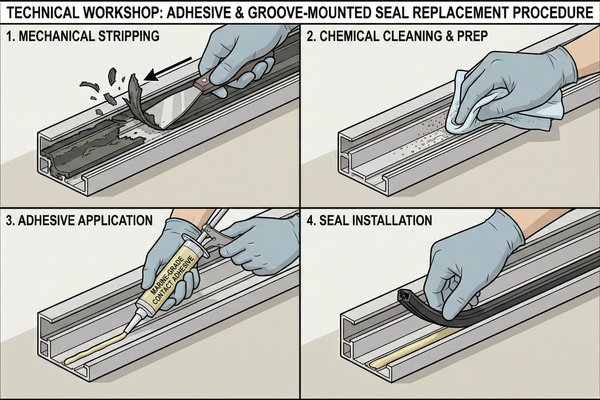
What is the procedure for replacing adhesive and groove-mounted seals?
The physical replacement requires patience and specific chemicals to ensure a bond that lasts for years.
The replacement procedure consists of four critical steps: mechanically stripping the damaged seal, chemically cleaning the groove or frame with industrial solvents to remove microscopic residue, applying a marine-grade contact adhesive (if not self-adhesive), and installing the new seal linearly without stretching it to prevent future retraction.
Techniques for Removal of Adhesive Residue and Surface Prep
The first two steps of the procedure—stripping and cleaning—are where 90% of repairs go wrong. You cannot simply pull off the old rubber and stick the new one on. The old adhesive has likely crystallized and bonded to the paint.
First, you must mechanically strip the frame. Use a sharp, flat scraper (plastic is safer for the paint, steel is faster but risky). Remove the bulk of the rubber and the thick chunks of old glue.
Second, you must chemically clean the substrate. Even if the steel looks clean to the naked eye, it is covered in microscopic grease, hand oils, and adhesive residue. You need a strong solvent. Methyl Ethyl Ketone (MEK) or Xylene are the industry standards for this, but they are aggressive. If you are working on a finished interior with delicate paint, 99% Isopropyl Alcohol is a safer alternative, though it requires more elbow grease. Soak a lint-free rag, wipe the frame vigorously, and wait 30 seconds for the solvent to break down the remaining glue. Scrape again. Repeat this process until your rag comes away completely white. The surface needs to be "squeaky clean"—literally.
Installation Protocols: Adhesive Bonding and Linear Crowding
The final steps involve the actual application. This depends on whether you are using a "groove-mount" (kerf) system or a surface-mount adhesive system.
For adhesive applications, use a high-temperature marine contact adhesive (like 3M 1357 or equivalent). Apply a thin, uniform layer to both the back of the rubber seal and the steel frame. Let it dry until it is tacky to the touch (usually 5-10 minutes) before joining them.
The most critical technique here is installing linearly without stretching. Rubber is elastic. When a worker installs a long strip, the natural tendency is to pull it taut to make it straight. This is a disaster. If you stretch the rubber during installation, it is under tension. Over the next 48 hours, it will attempt to return to its original length, causing it to shrink back and pull away from the corners, leaving massive gaps. The correct method is "crowding"—intentionally pushing more material into the space than seems necessary. If the door frame is 2000mm high, you should be trying to fit 2010mm of rubber into it. This puts the rubber under slight compression, ensuring it stays tight in the corners for years.
| Step | Tool / Material Needed | Estimated Cost (Kit) | Critical Action Note |
|---|---|---|---|
| 1. Removal | Flat Scraper (Plastic/Steel) | $5 - $10 USD | Remove 95% of old material mechanically. |
| 2. Cleaning | MEK, Acetone, or Alcohol | $15 - $20 USD / Liter | Wear gloves. Ensure 100% residue removal. |
| 3. Bonding | Contact Adhesive (e.g., 3M) | $20 - $40 USD / Can | Apply to both surfaces if using contact cement. |
| 4. Finishing | Hand Roller (2-inch) | $10 - $15 USD | Roll with 5kg pressure to activate bond. |
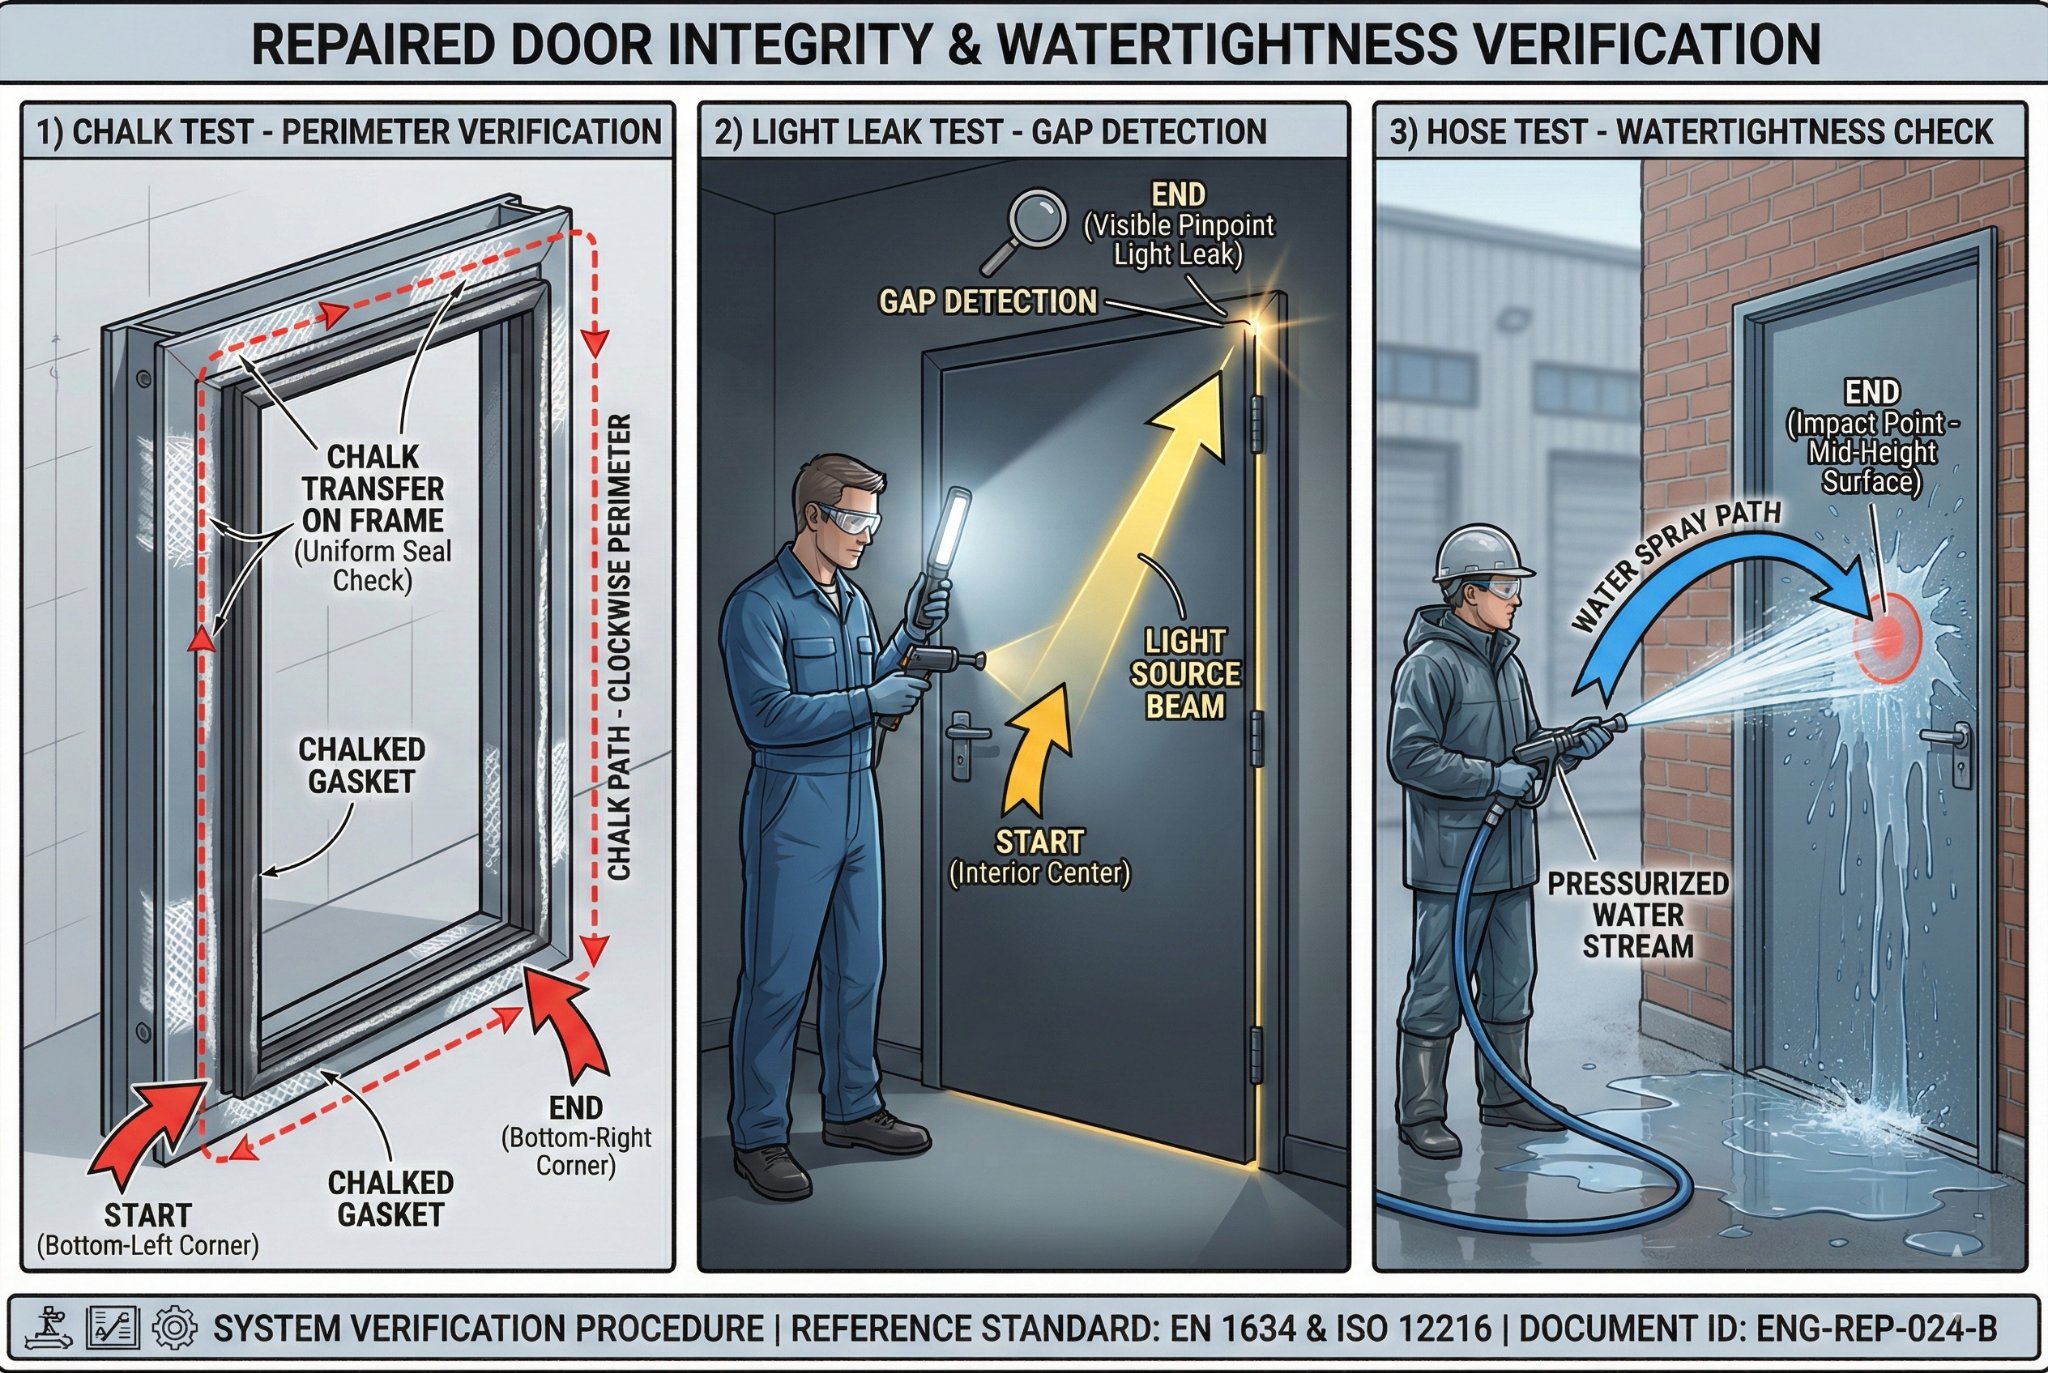
How to verify fire integrity and watertightness after repair?
A repair is not complete until you have proven that the door effectively seals the opening.
Verification protocols involve three primary tests: the Chalk Test to check for uniform compression around the perimeter, the Light Leak Test to identify visible gaps in the seal, and the Hose Test (specifically for weathertight external doors) to confirm resistance to water ingress under pressure.
Execution of the Chalk Test for Compression Analysis
The Chalk Test is the first and most fundamental test mentioned in the snippet. It is universally used by Class Surveyors because it is impossible to fake. You simply take a piece of colored builder's chalk (blue or red works best against white paint) and draw a continuous, thick line along the entire sealing face of the rubber strip you just installed.
Once the chalk is applied, close the door and latch it fully. It is important to engage the latch, as this pulls the door into its final resting position. Then, open the door and inspect the steel frame. You should see a solid, unbroken line of colored chalk transferred onto the frame. If you see a break in the line—even a small gap of 20mm—it means the rubber is not touching the steel at that point. Smoke acts like a fluid; if chalk didn't touch, smoke will pass through. Common failure points are the corners and the area directly around the latch mechanism. If the chalk test fails, you may need to adjust the strike plate or shim behind the seal to increase thickness.
Conducting Light Leak and Hose Tests
While the chalk test proves contact, the Light Leak Test3 and Hose Test prove integrity.
The Light Leak Test is ideal for internal cabin doors. Close the door with one person inside the cabin (lights off) and one person outside. The person outside runs a high-intensity flashlight (minimum 500 lumens) slowly around the perimeter of the door frame. If the person inside sees any pinpoints of light, the seal is breached. This is a stricter test than the chalk test and helps ensure acoustic privacy as well.
For external doors that lead to open decks, you must perform the Hose Test to verify weathertightness. This is a stress test. Use a standard fire hose with a 12mm (0.5 inch) nozzle. Stand 1.5 meters away from the door and spray the sealing joint directly with a water pressure of at least 2 bar (approx 30 psi). Move the stream slowly along the gap. Afterward, open the door and check the inner sill and the inside face of the frame. If there are any water droplets on the interior side of the seal, the door has failed. This usually indicates that the seal compression is too low, or the rubber profile is too small for the gap.
| Test Method | Objective | Equipment Required | Acceptance Criteria |
|---|---|---|---|
| Chalk Test | Verify physical contact. | Colored Chalk. | Continuous transfer line on the frame. |
| Light Test | Detect thru-gaps. | 500+ Lumen Torch. | No visible light inside the dark room. |
| Paper Test | Check compression force. | Standard A4 Paper. | Paper should be trapped and resist pulling. |
| Hose Test | Check water tightness (Ext). | Fire hose (2 bar). | No water droplets on the inside face. |
Conclusion
Repairing a marine fire door seal is about strict adherence to material specs and surface preparation.
To successfully repair marine fire door seals, you must identify the damage cause, buy MED-certified EPDM or Silicone, clean the frame chemically, install without stretching, and verify the result with a chalk test.
-
Familiarize yourself with ISO 815 standards to ensure compliance and safety in marine applications. ↩
-
Learn why Silicone Rubber is essential for safety in extreme conditions, ensuring longevity. ↩
-
Learn about the Light Leak Test, a crucial method for detecting breaches in door seals and ensuring acoustic privacy. ↩