Vessel upgrades often hit a wall when shipyards discover their existing doors don't meet updated SOLAS fire safety standards. Non-compliant doors mean failed inspections, costly delays, and potential safety violations that can ground a vessel indefinitely.
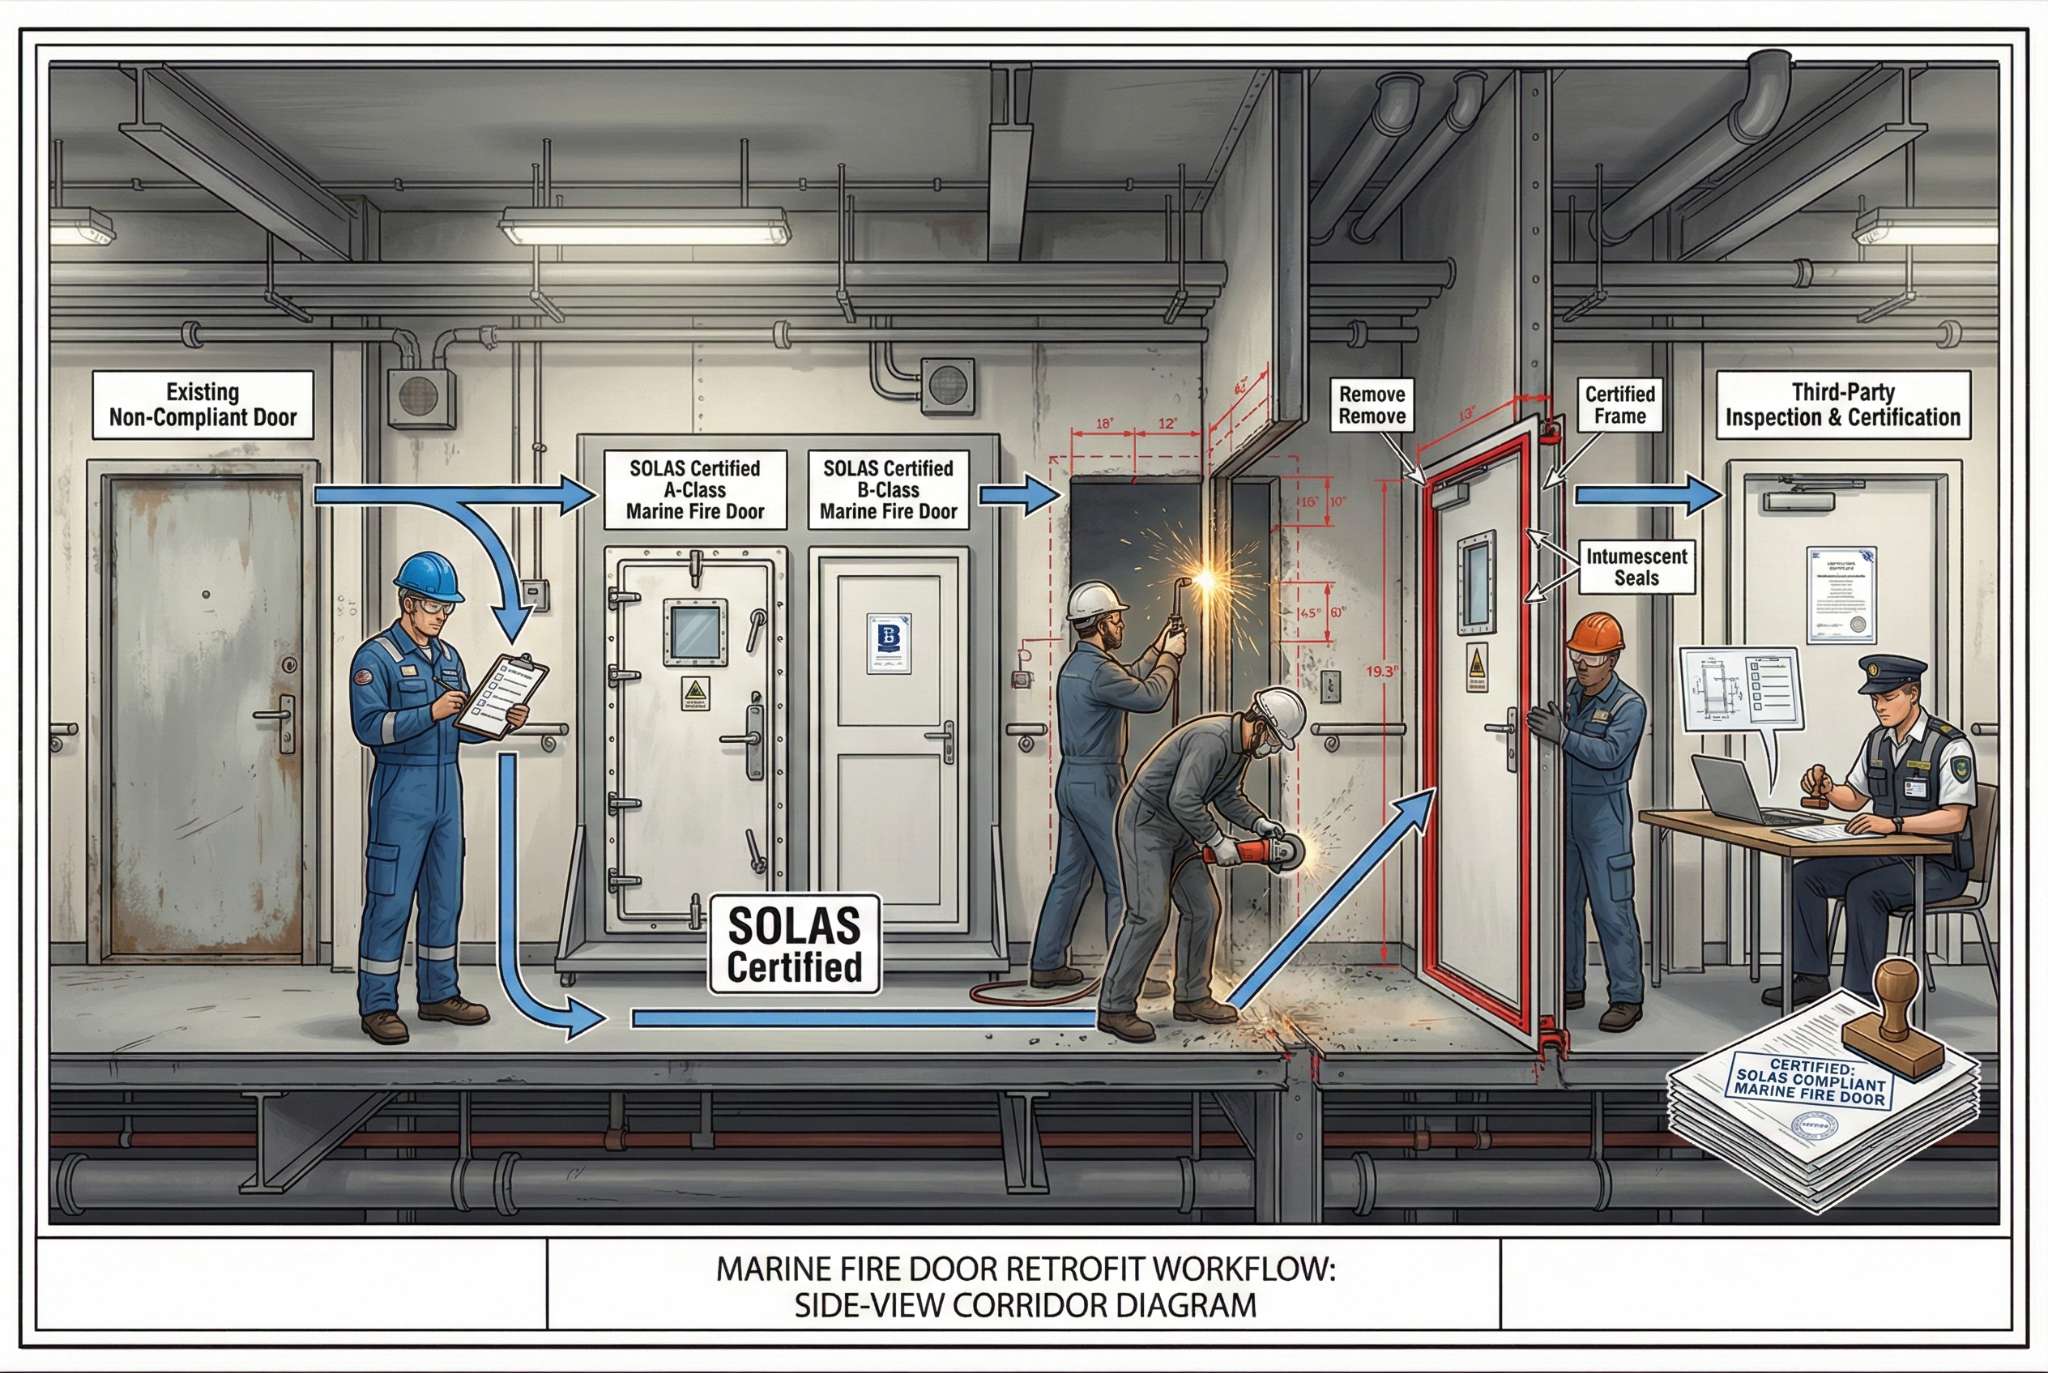
Retrofitting existing doors with marine fire doors involves five critical steps: conducting a comprehensive fire safety audit to identify non-compliant doors, selecting SOLAS-certified fire doors (A-Class or B-Class) matching the bulkhead's fire rating, removing old doors and preparing openings to meet dimensional tolerances, installing new fire doors with certified frames and intumescent seals, and completing third-party inspections with proper documentation. The entire process typically takes 2-4 weeks per vessel section, depending on the number of doors and accessibility constraints.
Throughout my years at marine outfitting facilities and later at Magellan Marine, I've guided dozens of shipyards through this exact challenge. The process isn't just about swapping doors—it's about understanding regulatory requirements, managing tight schedules, and ensuring every installation meets classification society standards. Let me walk through the complete retrofit process that has consistently delivered certified results.
What preparatory assessments are required before starting a marine fire door retrofit?
Before ordering a single door, shipyards face a critical decision point that determines project success or failure. Skipping thorough assessments leads to wrong door specifications, structural surprises during installation, and budget overruns that can exceed 40% of the original estimate.
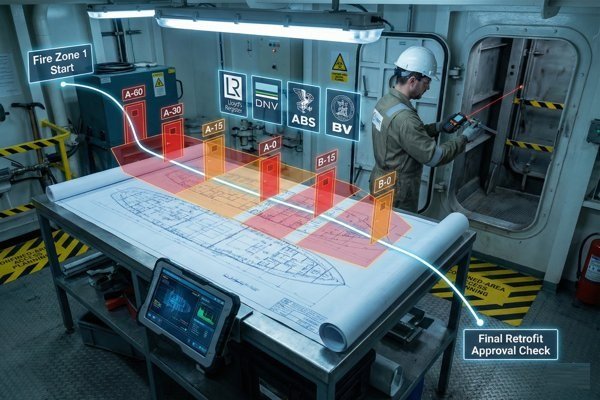
Preparatory assessments must include: a complete fire zone mapping audit identifying all doors requiring A-Class (A-60, A-30, A-15, A-0) or B-Class (B-15, B-0) ratings per SOLAS Chapter II-2, precise dimensional surveys of existing door openings with tolerance measurements, structural integrity evaluations of surrounding bulkheads to confirm load-bearing capacity, accessibility planning for installation crews in confined spaces, and coordination with classification societies (Lloyd's Register, DNV, ABS, BV) to confirm specific approval requirements for the vessel's flag state.
Fire Zone Classification and Door Rating Requirements
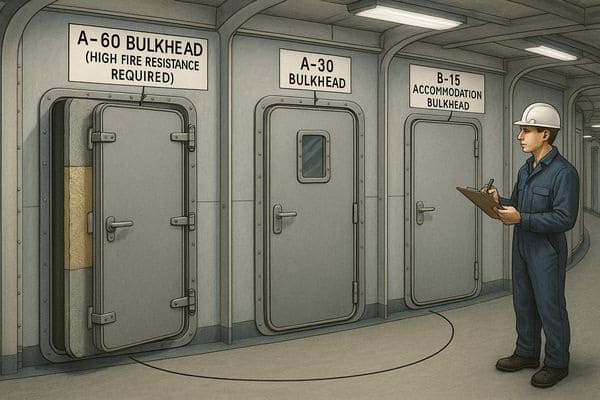
The first step involves mapping every compartment according to SOLAS fire safety regulations. This isn't guesswork—classification societies provide specific guidelines based on compartment function.
During a 2019 retrofit project for a 15,000-ton cargo vessel, we discovered the shipyard had misclassified six accommodation corridor doors as B-15 when they actually required A-0 ratings due to their proximity to the engine room. This single oversight would have resulted in survey rejection.
| Compartment Type | Required Fire Rating | Typical Door Specification | SOLAS Reference |
|---|---|---|---|
| Main vertical zone divisions | A-60 | Steel door with 60-minute fire resistance | SOLAS II-2/9.2.2.3 |
| Accommodation corridors | A-0 or B-0 | Self-closing door with smoke seal | SOLAS II-2/9.2.2.4 |
| Machinery space boundaries | A-60 or A-30 | Heavy-duty steel with ceramic fiber core | SOLAS II-2/9.2.3.2 |
| Galley/Pantry entrances | A-0 or B-15 | Lightweight steel with intumescent seal | SOLAS II-2/9.2.4.1 |
| Stairway enclosures | A-0 | Self-closing with vision panel option | SOLAS II-2/9.2.2.4 |
The classification society will provide a detailed fire control plan1 showing exactly which doors need upgrading. Always request this document before procurement begins.
Dimensional Survey and Structural Verification
Existing door openings rarely match standard marine fire door dimensions. I learned this the hard way during my early days at the marine outfitting factory when we shipped 12 doors to a shipyard in Vietnam, only to have seven require frame modifications because the openings were oversized by 15-25mm.
Professional dimensional surveys must record:
- Opening width and height (measure at top, middle, and bottom—bulkheads often shift over time)
- Bulkhead thickness (critical for frame depth selection, typically 40mm, 50mm, or 60mm for marine applications)
- Out-of-square measurements (deviations beyond ±3mm require correction)
- Clearance for door swing (minimum 90° opening must be verified, especially in narrow corridors)
For structural verification, engage a marine surveyor to assess:
- Bulkhead load-bearing capacity (fire doors with frames typically add 45-80 kg per installation)
- Welding surface condition (rust, paint, or coating thickness beyond 200 microns affects weld integrity)
- Access limitations (doors above 900mm width may not fit through existing passageways and require alternative routing)
Classification Society Pre-Approval Process
Every classification society has specific requirements for retrofit projects. Lloyd's Register, for example, requires submitted drawings showing existing conditions, proposed door specifications, and installation methods at least 30 days before work begins.
From my experience coordinating with multiple classification societies, the pre-approval package should include:
- Existing fire control plan with proposed modifications highlighted
- Door manufacturer's type approval certificates (must match the classification society or have mutual recognition agreements)
- Installation method statements including welding procedures (typically MIG or stick welding per AWS D1.1 standards)
- Quality control plan outlining inspection points and acceptance criteria
How to select appropriate marine fire doors for retrofit applications?
Choosing the wrong door specification is the costliest mistake in retrofit projects. Unlike new construction where you design around the doors, retrofits must balance regulatory compliance, existing structural constraints, and operational requirements—all while keeping the vessel on schedule.
Selecting appropriate marine fire doors requires matching the door's fire rating (A-60, A-30, A-15, A-0, B-15, B-0) to the bulkhead's SOLAS classification, ensuring the door dimensions accommodate existing openings with minimal structural modification, verifying the door's type approval certificate matches the vessel's classification society requirements, confirming core material compatibility (rockwool for A-Class doors typically 60-120mm thick, ceramic fiber blanket for high-temperature zones, vermiculite boards for B-Class applications), and evaluating operational features like self-closing mechanisms, vision panels, and hold-back devices based on crew workflow needs.
Understanding Fire Rating Requirements and Core Material Options
The fire rating determines everything else about the door. A-Class doors must maintain structural integrity and prevent heat transfer for their rated duration (60, 30, 15, or 0 minutes), while B-Class doors only need to prevent flame passage for their rated time (15 or 0 minutes).
Core material selection directly impacts performance and cost:
| Core Material | Suitable Fire Ratings | Thickness Range | Temperature Resistance | Approximate Cost per m² | Weight Impact |
|---|---|---|---|---|---|
| Rockwool density 120-160 kg/m³ | A-60, A-30, A-15 | 60-120mm | Up to 1000°C | $45-65 | Heavy (adds 35-50 kg per door) |
| Ceramic fiber blanket | A-60, A-30 (high-heat zones) | 50-100mm | Up to 1260°C | $70-95 | Moderate (adds 25-40 kg) |
| Vermiculite boards | A-0, B-15, B-0 | 30-50mm | Up to 800°C | $30-45 | Light (adds 15-25 kg) |
| Perlite composite | B-15, B-0 | 25-40mm | Up to 600°C | $25-35 | Lightest (adds 10-18 kg) |
During a 2021 upgrade project for a passenger ferry operating in Mediterranean routes, we faced a challenge with eight doors in the engine room entrance corridor. The original doors were non-rated hollow steel, and the bulkhead classification required A-30. However, the corridor width was only 1.2 meters, making heavy doors impractical for crew operations.
We selected A-30 doors with ceramic fiber core instead of rockwool, reducing each door's weight from approximately 95 kg to 68 kg. This made daily operations significantly easier while maintaining full compliance. The cost difference was $280 per door, but the operational benefit justified the investment.
Frame Configuration and Installation Method Selection
Marine fire door frames come in three primary configurations, each suited to different retrofit scenarios:
Welded Steel Frames (Most Common): These frames integrate directly into the bulkhead through continuous perimeter welding. They provide the strongest installation and best fire containment but require skilled welders and surface preparation. Installation typically takes 4-6 hours per door including welding and post-weld treatment.
Bolted Frames with Intumescent Seals: Used when welding is restricted due to nearby equipment or in aluminum superstructures where steel welding creates galvanic corrosion risks. Installation is faster (2-3 hours per door) but requires precise bolt hole alignment. The intumescent seal must be rated for the same fire resistance as the door.
Hybrid Frames (Welded Base with Bolted Trim): These combine a welded structural frame with bolted decorative or functional trim pieces. They're ideal for accommodation areas where aesthetics matter but fire rating cannot be compromised.
For retrofit projects, I recommend welded steel frames for 80% of applications. They provide the most reliable long-term performance and easiest certification process with classification societies.
Type Approval Certificates and Classification Society Recognition
Every marine fire door must have a type approval certificate2 from a recognized testing laboratory. However, not all certificates are accepted by all classification societies.
Before ordering doors, verify:
- Testing Laboratory Credentials: The door must be tested by a laboratory recognized by your vessel's classification society (e.g., Warringtonfire, Efectis, RINA, CCS)
- Test Standard Compliance: IMO Resolution A.754(18)3 is the universal standard, but some flag states require additional national standards (USCG for U.S.-flagged vessels, MCA for UK vessels)
- Certificate Validity Period: Most type approvals are valid for 5 years; expired certificates require retesting
- Scope of Approval: The certificate must cover the exact door configuration you're ordering, including dimensions, core material, hardware, and vision panel specifications
I once worked with a shipyard in Indonesia that purchased 24 marine fire doors from a Chinese manufacturer with valid CCS (China Classification Society) type approval. Unfortunately, their vessel was classed with Lloyd's Register, which required mutual recognition documentation that the manufacturer couldn't provide. This resulted in a 6-week delay while we sourced replacement doors from an approved supplier—a costly mistake that proper verification would have prevented.
Operational Features and Hardware Selection
Retrofit projects often overlook operational requirements that affect daily crew workflows. A technically compliant door that's difficult to operate will be propped open, defeating its purpose.
Critical operational considerations include:
Self-Closing Mechanisms: SOLAS requires most fire doors to be self-closing. For retrofit applications, choose between:
- Hydraulic door closers (adjustable closing speed, suitable for high-traffic areas, cost $85-150 per unit)
- Spring-loaded hinges (lower cost at $35-60 per set, but less control over closing speed)
- Electromagnetic hold-open devices with smoke detector release (cost $220-350 per door, ideal for accommodation corridors where doors would otherwise obstruct traffic)
Vision Panels: Glass vision panels improve safety by allowing crew to see obstacles before opening doors in narrow passageways. However, they must use fire-rated glass:
- Wired glass (30-minute rating maximum, cost $120-180 per panel, traditional option)
- Ceramic glass (60-minute rating possible, cost $280-400 per panel, clearer visibility)
- Intumescent laminated glass (45-60 minute rating, cost $350-500 per panel, best optical clarity)
Threshold Configuration: Retrofit projects must decide whether to maintain flush thresholds or add raised thresholds:
- Flush thresholds preserve accessibility but require drop-seal mechanisms (adds $90-140 per door)
- Raised thresholds (typically 12-25mm height) provide better smoke sealing and cost less but create tripping hazards
What are the step-by-step procedures for removing old doors and preparing openings?
The removal and preparation phase determines whether installation goes smoothly or becomes a struggle against structural surprises. Rushing this stage to save a day or two typically costs a week in corrections and rework.
Removing old doors and preparing openings involves: systematically disconnecting and removing existing door hardware and frames using plasma cutters or grinders for welded installations, grinding away all residual weld material and rust to expose clean base metal, measuring and correcting opening dimensions to match new door specifications (typically requiring ±2mm tolerance), verifying bulkhead perpendicularity and flatness using laser levels or plumb lines, surface preparation through grinding and wire brushing to achieve ISO 8501-1 Sa 2½ cleanliness standard for welding surfaces, and applying temporary weather protection or fire watches if the opening creates fire zone breaches during the retrofit period.
Systematic Hardware and Frame Removal Techniques
Old door removal sounds straightforward until you encounter a door that's been painted over 15 times, with hinges welded and bolted, in a corridor where you can barely swing a hammer. Systematic approaches prevent damage to surrounding bulkheads and speed up the process.
For Welded Frame Removal:
Start by removing the door leaf from its hinges. If hinges are corroded or painted over, apply penetrating oil and wait 30 minutes before attempting removal. For severely seized hinges, carefully grind off the hinge pin heads rather than forcing removal.
Frame removal requires cutting the welds that attach the frame to the bulkhead. I prefer using a 125mm angle grinder with a 1mm cutting disc rather than plasma cutters for this work. While plasma cutters are faster, they create excessive heat that can warp thin bulkheads (common in accommodation areas where bulkhead thickness is often just 4-6mm).
The cutting sequence matters:
- Cut vertical welds first (both sides of the frame, top to bottom)
- Cut horizontal welds second (top, then bottom)
- Apply light pry bar pressure to separate frame sections as you cut
- Work from top to bottom to prevent frame pieces from falling unexpectedly
During a retrofit on a 20-year-old container vessel, we discovered that frames had been continuously welded with no gaps, creating significant thermal distortion. By cutting in 300mm sections and alternating sides, we prevented bulkhead warping that would have required costly straightening.
For Bolted Frame Removal:
Bolted frames are theoretically simpler but often become complicated when bolts have corroded into the bulkhead structure. Before attempting removal:
- Apply penetrating oil to all bolt threads and wait at least 2 hours (overnight is better for severely corroded installations)
- Use impact wrenches rather than standard wrenches (pneumatic impact wrenches provide better results than battery-powered models for marine applications)
- Cut bolt heads as a last resort using an angle grinder with a thin cutting disc
Opening Dimension Correction and Structural Verification
After frame removal, you'll almost always find that the opening doesn't match the dimensions you measured earlier. Paint buildup, frame lips, and structural deformations all contribute to discrepancies.
Professional opening correction involves:
| Correction Type | Tolerance Range | Method | Typical Time Required | Special Considerations |
|---|---|---|---|---|
| Width adjustment (undersized) | 5-15mm shortage | Weld steel plates to jamb sides, grind flush | 3-4 hours | Requires preheating if bulkhead is >10mm thick |
| Width adjustment (oversized) | 5-20mm excess | Install filler plates welded to bulkhead | 2-3 hours | Filler plates must match bulkhead thickness |
| Height adjustment | ±10mm variance | Weld threshold plate or header reinforcement | 2-3 hours | Affects door swing clearance |
| Out-of-square correction | 3-8mm deviation | Grind high spots, weld low spots, re-verify | 4-6 hours | May require structural consultation if >8mm |
| Bulkhead warping | >5mm deviation from plane | Hydraulic straightening or reinforcement plates | 6-10 hours | Common in areas with previous fire damage |
I always verify dimensions at three points (top, middle, bottom) for both width and height. On a 2020 project for a 12,000-ton bulk carrier, we found a 14mm difference between the top and bottom width measurements on a single door opening—evidence of long-term structural settling that would have prevented proper door installation without correction.
Surface Preparation for Welding and Frame Installation
Surface preparation determines weld quality, which directly affects fire containment performance. Poor surface prep is the leading cause of failed fire door inspections, according to Lloyd's Register statistics from their 2018-2022 survey reports.
Grinding and Cleaning Standards:
Marine fire door installations require ISO 8501-1 Sa 2½4 surface cleanliness standard, which means:
- All rust, mill scale, and paint removed to expose bare metal
- Surface profile of 40-75 microns (Rz value) for optimal weld penetration
- Cleaning within a 50mm zone on both sides of the weld line
- Immediate welding within 4 hours of surface preparation in humid environments (relative humidity >75%)
The grinding sequence I recommend:
- Coarse grinding (40-grit flap disc) to remove heavy rust, old weld material, and paint buildup
- Medium grinding (80-grit flap disc) to create uniform surface texture
- Wire brush cleaning (power wire wheel) to remove grinding dust and verify complete paint removal
- Solvent wipe using acetone or approved marine-grade cleaner to remove oil residues
- Visual inspection under adequate lighting (minimum 500 lux) to confirm cleanliness
During surface preparation on a passenger vessel retrofit in 2019, the shipyard initially used only wire brushing without grinding. When the classification society surveyor arrived, he rejected eight door installations because paint residue was still visible in weld zones. This required complete re-preparation and delayed the project by five days.
Bulkhead Thickness Verification and Welding Surface Assessment:
Before ordering frames, verify the actual bulkhead thickness using an ultrasonic thickness gauge. I've encountered multiple situations where vessel drawings showed 5mm bulkheads, but actual measurements revealed 4mm due to long-term corrosion—a critical difference that affects frame selection and welding procedures.
For bulkheads thinner than 4mm or thicker than 12mm, special considerations apply:
- Thin bulkheads (<4mm): Risk of burn-through during welding requires skilled welders and possible backing plates
- Thick bulkheads (>10mm): Require preheating to 100-150°C before welding to prevent cracking
- Aluminum bulkheads: Cannot be welded to steel frames; must use bolted installations with insulation barriers
Temporary Fire Protection and Safety Measures During Retrofit
Removing fire doors creates temporary breaches in the vessel's fire containment system—a serious safety concern that requires documented mitigation measures.
Classification societies typically require:
- Fire watches stationed at each open fire door location during working hours (crew members with firefighting training and communication equipment)
- Temporary fire-resistant barriers installed at the end of each work shift (typically mineral wool blankets secured with steel frames)
- Modified fire patrol routes documented in the vessel's safety management system
- Hot work permits for all cutting and welding operations, with continuous fire watch for 60 minutes after work completion
On a retrofit project for a chemical tanker, we installed temporary fire curtains rated for 30-minute fire resistance at each opening. These curtains (available from marine safety suppliers at approximately $280-400 per unit) could be quickly deployed at the end of each work shift and removed when work resumed. This approach satisfied the classification society requirements while maintaining operational flexibility.
Environmental Protection During Removal:
Grinding and cutting operations generate significant debris and dust. In accommodation areas or near sensitive equipment, implement:
- Plastic sheeting barriers to contain dust (6-mil thickness minimum)
- HEPA-filtered vacuum systems5 for continuous dust collection during grinding
- Spark shields to protect nearby equipment from grinding sparks
- Ventilation fans to maintain negative pressure in the work area, preventing dust migration
The investment in proper containment typically costs $150-300 per door location but prevents thousands of dollars in cleaning costs and equipment damage.
How to install new marine fire doors and ensure proper alignment?
Installation is where theoretical planning meets physical reality. Even with perfect preparation, door installation requires precision work in often challenging conditions—cramped spaces, vessel movement, and time pressure all conspire against quality results.
Installing new marine fire doors requires: positioning the frame assembly with precise alignment using laser levels and shims to achieve ±2mm dimensional tolerance, tack welding at strategic points (typically six locations: four corners and midpoints of vertical jambs) to secure position before full welding, executing continuous or intermittent welding per AWS D1.1 standards using appropriate electrode selection (E7018 for stick welding, ER70S-6 wire for MIG welding), verifying door leaf operation with proper clearances (3-5mm perimeter gap, 8-12mm bottom clearance), installing and adjusting self-closing mechanisms to achieve 3-5 second closing time, applying intumescent seals along the frame perimeter to ensure complete smoke and flame barriers, and conducting functional testing including repeated open/close cycles and latch engagement verification.
Frame Positioning and Alignment Verification Techniques
Frame alignment is the foundation of a successful installation. Misaligned frames cause door binding, poor sealing, and premature hardware failure. Classification societies will reject installations with alignment errors exceeding ±2mm.
Laser Level Alignment Method (Professional Standard):
For professional results, I always use a rotating laser level mounted on a tripod. This method ensures consistent accuracy across all installation points.
The alignment sequence:
- Set vertical reference lines using the laser level to project plumb lines on both sides of the opening
- Position the frame with the face flush to the bulkhead or at the specified reveal depth (typically 0-10mm recess)
- Verify plumb using digital levels accurate to ±0.1° (bubble levels lack sufficient precision for marine applications)
- Check diagonal measurements to ensure the frame is square (diagonals must match within ±2mm)
- Install shims at 300mm intervals along jambs to maintain position during welding
Shimming Strategy for Different Bulkhead Conditions:
| Bulkhead Condition | Shim Material | Placement Interval | Key Considerations |
|---|---|---|---|
| Flat steel (<2mm deviation) | 1-3mm steel shims | Every 400mm | Use magnetic shims for temporary positioning |
| Warped steel (2-5mm deviation) | Tapered steel wedges | Every 250mm | Orient wedges to compensate for warp direction |
| Corroded surface (uneven) | Multiple thin shims stacked | Every 200mm | Never use single thick shims; build up with multiple thin layers |
| Thin bulkhead (<4mm) | Backing plates behind shims | Every 300mm | Prevents bulkhead deformation during welding |
During a retrofit on a 25-year-old RoRo vessel, we encountered bulkheads with 6-8mm of deviation from plane due to years of cargo impact. Standard shimming couldn't compensate for this degree of warping. We had to install 50x50x5mm steel reinforcement plates welded to the bulkhead at shim locations before frame installation. This added two days to the schedule but ensured proper frame support.
Welding Procedures and Quality Control Requirements
Welding quality directly determines whether the door will maintain its fire rating during an actual fire event. Poor welding creates gaps where flames and smoke can penetrate, completely defeating the door's purpose.
Tack Welding Strategy:
Before full welding, secure the frame with strategic tack welds:
- Six minimum tack welds: top corners, bottom corners, and midpoint of each vertical jamb
- Tack length of 25-40mm each with 5-6mm throat thickness
- Alternating sequence: start at top left, then bottom right, then bottom left, then top right, then vertical midpoints
This alternating pattern prevents frame distortion from heat concentration. I learned this lesson during my early days when we tack welded one side completely before moving to the other—the frame twisted 4mm out of alignment, requiring complete removal and re-installation.
Full Welding Procedures:
Marine fire door frames require either continuous or intermittent welding depending on the frame design and classification society requirements. Most modern frames use continuous fillet welds for maximum fire containment.
Welding parameters for typical marine steel (mild steel, 4-8mm thickness):
MIG Welding (Most Common):
- Wire: ER70S-6, diameter 0.9-1.2mm
- Gas: 75% Argon / 25% CO₂ mix
- Voltage: 18-22V depending on material thickness
- Wire feed speed: 5-8 m/min
- Travel speed: 250-400 mm/min
- Weld throat thickness: Minimum 4mm for 5mm bulkhead, 5mm for 6-8mm bulkhead
Stick Welding6 (When MIG Equipment Unavailable):
- Electrode: E7018, diameter 3.2mm or 4.0mm
- Current: 120-140A for 3.2mm electrode, 150-180A for 4.0mm electrode
- Polarity: DC electrode positive (DCEP)
- Travel speed: 150-250 mm/min
- Multiple passes required for throat thickness >5mm
Quality control during welding:
- Visual inspection every 500mm of weld to check for undercut, porosity, or incomplete fusion
- Smoke pencil testing at 25-30% completion intervals to identify potential leak paths (hold smoke source near weld; smoke drawn into gaps indicates incomplete seal)
- Slag removal between passes using chipping hammer and wire brush
- Final weld inspection using 10x magnification to identify micro-cracks or porosity
Door Leaf Installation and Operational Adjustment
With the frame securely welded and cooled (allow minimum 30 minutes cooling time for frames, 60 minutes for thick bulkheads), door leaf installation requires careful attention to clearances and hardware adjustment.
Hinge Installation and Adjustment:
Marine fire door hinges must be through-bolted (not surface-mounted) for structural integrity. Installation sequence:
- Mount hinges to door leaf first using provided hardware torqued to manufacturer specifications (typically 40-50 Nm for M10 bolts)
- Position door in frame using a floor jack or adjustable door lift to support the weight (A-60 doors can weigh 80-120 kg)
- Mark hinge mounting locations on frame while door is held in position
- Drill through-bolt holes using correct drill size (10.5mm for M10 bolts, 13.0mm for M12 bolts)
- Install and torque hinge bolts with thread-locking compound applied to prevent loosening from vessel vibration
Critical Clearance Verification:
Proper clearances ensure the door operates smoothly while maintaining fire containment when closed:
| Clearance Location | Required Dimension | Verification Method | Adjustment If Out of Spec |
|---|---|---|---|
| Top edge (door to frame) | 3-5mm | Feeler gauge at three points | Adjust hinge mounting positions vertically |
| Latch edge (door to frame) | 3-5mm | Feeler gauge at three points | Adjust hinge shims laterally |
| Hinge edge (door to frame) | 3-4mm | Feeler gauge at three points | Adjust frame recess depth |
| Bottom edge (door to deck/threshold) | 8-12mm | Gap gauge or visual with ruler | Adjust hinge mounting positions, or trim door if >15mm |
| Compression seal contact | 1-2mm compression | Press intumescent seal and verify resistance | Replace seal if insufficient compression |
I always test door operation by opening and closing it 10-15 times before proceeding to hardware installation. This reveals any binding points that need correction before the door is fully commissioned.
Self-Closing Mechanism Installation and Calibration
SOLAS requires most marine fire doors to be self-closing, with closing time typically between 3-5 seconds from 90° open position. Too fast creates safety hazards; too slow allows smoke spread during fire events.
Hydraulic Door Closer Installation:
Premium hydraulic door closers (brands like DICTATOR, Briton, or Dorma Marine) offer adjustable closing speed and latching speed—the two critical parameters for marine applications.
Installation best practices:
- Mount closer on the high-pressure side of the door (the side facing potential fire exposure) unless access constraints prevent this
- Use all mounting screws provided—never skip screws to save time
- Set initial closing speed to 4 seconds for the 90° to 15° range
- Set latching speed to 1.5 seconds for the final 15° to 0° range (faster latching ensures positive closure even if someone partially resists the door)
- Test closing force at the latch edge: should be 25-40N maximum (too much force creates safety hazards, too little may not overcome wind pressure or vessel movement)
Spring-Loaded Hinge Alternative:
For lower-budget projects or lighter B-Class doors, spring-loaded hinges provide adequate self-closing function at significantly lower cost ($35-60 versus $85-150 for hydraulic closers).
The limitation: spring tension is not adjustable. You must select the correct spring rating at purchase based on door weight and width. For a standard 850mm x 2000mm door weighing 45-60 kg, specify "medium duty" spring hinges with closing force rated at 30-45N.
Intumescent Seal Installation and Smoke Seal Verification
Intumescent seals expand when exposed to heat, filling gaps between the door and frame to prevent smoke and flame penetration. Proper seal installation is as critical as the door itself—a $15 seal improperly installed can cause a $4,000 door to fail its fire rating.
Seal Types and Applications:
- Graphite-based intumescent strips: Expand to 10-15x original thickness at 200-250°C, suitable for A-Class and B-Class doors, cost $8-15 per meter
- Ceramic fiber rope seals: Expand to 3-5x original thickness at 300-400°C, suitable for high-temperature A-60 applications, cost $18-28 per meter
- Intumescent brush seals: Combine smoke sealing with intumescent properties, ideal for high-traffic doors, cost $22-35 per meter
Installation technique:
- Clean frame seal channel with acetone to ensure adhesive bonding
- Cut seal lengths with 45° miters at corners to ensure continuous coverage
- Apply seal starting at top center working toward corners to prevent stretching
- Press seal firmly into channel using a roller tool or wooden block
- Verify seal compression when door is closed (should see slight deformation of seal material but no gaps)
Smoke Seal Testing:
After installation, conduct a smoke pencil test:
- Close and latch the door
- Hold a smoke pencil or smoke source around the entire door perimeter, moving slowly at approximately 50mm per second
- Watch for smoke being drawn through any gaps
- Any smoke infiltration indicates inadequate sealing requiring seal replacement or adjustment
What inspection and certification procedures are required after installation?
Installation completion isn't project completion—not until the classification society surveyor signs off on the work. Failed inspections can require complete re-installation, turning a profitable project into a financial disaster.
Post-installation inspection and certification requires: conducting comprehensive functionality testing including 50+ open/close cycles to verify smooth operation and proper latch engagement, performing smoke seal integrity tests using smoke pencils or pressure decay methods to confirm zero leakage paths, completing dimensional verification with certified instruments to document all clearances meet specification, conducting welding inspection with visual examination and dye penetrant testing for critical welds, submitting installation documentation packages including material certificates, weld procedure specifications, and installer qualifications to the classification society, scheduling third-party surveyor inspection at least 7-10 days in advance to ensure availability, and obtaining final certification with door identification plates affixed showing fire rating, approval number, and installation date per SOLAS requirements.
Comprehensive Functionality and Operational Testing Procedures
Before calling the classification society surveyor, conduct thorough internal testing to identify and correct any deficiencies. Surveyors charge for return visits when installations fail inspection—typically $800-1,500 per additional visit depending on location.
50-Cycle Operation Test:
This test reveals problems that aren't apparent in limited testing:
- Perform 50 complete open/close cycles at normal operating speed
- Document any changes in door operation (increased resistance, noise, binding points)
- Check hardware tightness every 10 cycles (loose bolts indicate insufficient torque or missing thread-locking compound)
- Verify consistent latching on every cycle (intermittent latching failure indicates misalignment)
- Monitor self-closing performance to ensure closing time remains within 3-5 seconds throughout all 50 cycles
During a 2020 project on a cruise vessel, one door passed initial testing but began binding at the top corner after 30 cycles. Investigation revealed that welding heat had caused 2mm of frame distortion that only became apparent after thermal cycling from repeated use. We had to re-grind and re-weld that corner—work that would have caused a failed classification society inspection if not caught during internal testing.
Load Testing for Self-Closing Mechanisms:
Self-closing devices must overcome resistance from wind pressure, vessel movement, and aging. Test this by:
- Adding resistance during closing using hand pressure at the door edge (approximately 15-20N opposing force)
- Verifying the door still closes and latches despite resistance
- Testing closing performance with vessel motion simulation if possible (rock the door gently while closing to simulate vessel movement)
Latch Engagement Verification:
Inadequate latch engagement is a common failure point. Test by:
- Closing the door and attempting to push it open without operating the handle (should require >100N force to open)
- Measuring latch projection into strike plate using depth gauge (minimum 12mm engagement for marine applications)
- Checking strike plate alignment to ensure latch contacts center of strike opening, not edges
Smoke Seal Integrity and Pressure Decay Testing Methods
Smoke seal integrity is critical for fire containment performance but difficult to verify visually. Two testing methods provide reliable results:
Smoke Pencil Method (Standard Approach):
This method reveals leak paths visible to the human eye:
- Close and latch the door ensuring all seals are compressed
- Darken the surrounding area if possible (smoke is more visible against dark backgrounds)
- Generate smoke at the door perimeter moving slowly (approximately 50mm per second) around the entire frame
- Watch for smoke infiltration from the opposite side of the door
- Mark any leak points with chalk for correction
Acceptable standard: Zero visible smoke penetration at any point along the perimeter when tested from either side.
Pressure Decay Method (Advanced Verification):
For critical installations or when smoke testing shows marginal results, pressure decay testing provides quantitative data:
- Seal one side of the door with plastic sheeting taped to create an airtight enclosure
- Introduce compressed air through a small opening to create 50 Pa positive pressure (use a manometer to measure)
- Seal the air inlet and monitor pressure over 5 minutes
- Calculate decay rate: Acceptable performance shows <10 Pa pressure loss over 5 minutes
This method requires specialized equipment (digital manometer, air compressor, sealing materials) but provides objective evidence of seal performance that classification societies value for challenging installations.
Welding Inspection Standards and Non-Destructive Testing Requirements
Classification societies require documented welding inspection following recognized standards. For marine fire door installations, AWS D1.1 (Structural Welding Code - Steel) provides the inspection framework.
Visual Weld Inspection Criteria:
Surveyors examine welds for these defects:
| Defect Type | Acceptance Criteria | Common Causes | Correction Method |
|---|---|---|---|
| Undercut | Maximum 1mm depth, maximum 25mm continuous length | Excessive welding speed or current | Grind smooth and re-weld affected area |
| Porosity | Maximum 3mm diameter, no more than one per 100mm length | Contaminated base metal or shielding gas issues | Grind out porous area and re-weld |
| Incomplete fusion | Zero tolerance (complete rejection) | Insufficient heat or poor joint access | Complete re-welding of affected section |
| Cracks | Zero tolerance (complete rejection) | Excessive cooling rate or base metal issues | Grind out crack plus 50mm beyond visible ends, re-weld |
| Excessive spatter | Cosmetic concern only unless interfering with seal contact | Improper welding parameters | Grind or chip off spatter |
Dye Penetrant Testing for Critical Welds:
Some classification societies require dye penetrant testing (PT) for fire doors in critical locations such as main vertical zone divisions or machinery space boundaries. The PT process:
- Clean weld surface thoroughly with solvent to remove all contaminants
- Apply penetrant dye (typically red) and allow to dwell for 10-20 minutes
- Remove excess penetrant using lint-free cloths and cleaner
- Apply developer (white powder) which draws penetrant from any cracks or defects
- Inspect after 10 minutes for red indications showing defect locations
Any linear indications exceeding 3mm length or clustered indications (four or more within 50mm) require weld repair.
Documentation Package Preparation for Classification Society Submission
Classification societies require comprehensive documentation proving that materials, workmanship, and installation methods meet approved standards. Incomplete documentation is the second-most-common reason for failed inspections (after actual installation defects).
Required Documentation Components:
Material Certificates and Traceability:
- Door manufacturer's type approval certificate with test report references
- Material certificates for door components (steel grade, core material specifications)
- Hardware manufacturer certifications (hinges, closers, latches must have marine approval)
- Intumescent seal fire rating certificates matching door classification
- Paint or coating certificates if finish coatings are applied (must not degrade fire performance)
For a recent project involving 18 fire doors on a chemical tanker, we created a documentation binder for each door containing all certificates, installation photos at key stages, and test results. This level of organization impressed the DNV surveyor and resulted in first-time approval for all installations.
Welding Documentation:
- Welder qualification certificates proving welders are certified to AWS D1.1 or equivalent (certificates must be current, typically valid for 6 months to 2 years)
- Welding procedure specification (WPS) documenting electrode type, current, voltage, and technique
- Weld maps showing weld locations and lengths
- Visual inspection reports documenting acceptance of all welds
Installation Records:
- Dimensional inspection reports with as-built measurements of all clearances
- Functionality test results including cycle testing and closing time measurements
- Smoke seal test results with photographic evidence where possible
- Installation photographs showing frame positioning, welding progression, and final condition
Scheduling and Managing Classification Society Surveyor Inspections
Surveyor availability varies significantly by location and season. In major ports (Singapore, Rotterdam, Hamburg), surveyors can typically arrive within 3-5 working days. In remote locations, expect 2-3 weeks lead time or longer.
Scheduling Best Practices:
- Submit inspection request 7-10 days in advance with preferred date range
- Provide complete door inventory listing locations, fire ratings, and manufacturer for each door
- Indicate any access challenges (confined spaces requiring special equipment, areas requiring permits)
- Confirm surveyor's specific requirements (some surveyors require additional tests or documentation beyond standard requirements)
Inspection Day Preparation:
From my experience coordinating over 40 classification society inspections, preparation determines whether the day goes smoothly or becomes chaotic:
- Ensure all doors are accessible with lighting adequate for inspection (minimum 500 lux)
- Have the documentation package organized in binders with tabs for easy reference
- Assign a knowledgeable escort who can answer technical questions about installation methods
- Prepare testing equipment (smoke pencils, feeler gauges, digital level, torque wrench for verification checks)
- Have touch-up materials available (paint, sealant, minor adjustment tools) for immediate correction of minor deficiencies
Common Surveyor Findings and Immediate Corrections:
Most surveyor findings involve minor issues that can be corrected immediately:
| Finding | Typical Correction Time | Materials Needed |
|---|---|---|
| Intumescent seal gap at corner | 15-20 minutes | Replacement seal section, adhesive |
| Insufficient latch engagement | 30-45 minutes | Strike plate repositioning or shimming |
| Hardware bolt not torqued correctly | 10 minutes per door | Torque wrench7, thread-locking compound |
| Door identification plate missing | 5 minutes per door | Pre-prepared plates with approval data |
| Minor weld spatter on seal surface | 20-30 minutes | Grinding disc, wire brush |
Having materials and tools ready for these common corrections can mean the difference between same-day approval and scheduling a return visit.
Final Certification and Door Identification Plate Installation
Upon successful inspection, the classification society issues a certification document that must be retained in the vessel's documentation. However, physical identification on each door is equally important.
Door Identification Plate Requirements:
SOLAS regulation II-2/9.6.3 requires each fire door to be permanently marked with:
- Fire rating classification (A-60, A-30, A-15, A-0, B-15, B-0)
- Approval authority (classification society name and approval number)
- Manufacturer identification
- Installation date (month and year minimum)
- Self-closing notation if applicable
These plates are typically stainless steel, 100mm x 50mm minimum size, with engraved or stamped markings. Install plates:
- On the door leaf (not the frame, as frames may be replaced while doors remain)
- At eye level when possible (1.4-1.6m above deck)
- Using tamper-resistant fasteners (rivets or security screws)
Cost is minimal ($8-15 per plate) but the importance is significant—during Port State Control inspections, missing or incorrect identification plates can result in detention until corrected.
Record Retention Requirements:
Maintain permanent records of:
- Classification society approval certificates (original or certified copies)
- Installation documentation packages (required for vessel's lifetime)
- Maintenance records (log all repairs, seal replacements, hardware adjustments)
I recommend creating digital backup copies of all documentation stored in multiple locations. During a 2021 PSC inspection in Rotterdam, a vessel's fire door documentation was lost due to an office computer failure. Fortunately, the shipyard that performed the installation had maintained backup copies, preventing what could have been a costly vessel detention.
Conclusion
Retrofitting marine fire doors demands systematic planning, precise execution, and thorough documentation—but following these proven procedures ensures successful classification society approval while maintaining vessel safety standards throughout the upgrade process.
-
A fire control plan is essential for ensuring safety and compliance in marine operations. ↩
-
Find out the importance of type approval certificates in ensuring safety and compliance. ↩
-
Understand the international standards that govern fire door safety and compliance. ↩
-
Learn about the ISO 8501-1 Sa 2½ standard for optimal welding surface preparation. ↩
-
Understand how HEPA-filtered vacuum systems help maintain a clean and safe work environment. ↩
-
Knowing when to use Stick Welding can save time and resources in challenging conditions. ↩
-
Using a torque wrench correctly is crucial for safety; learn its application in inspections. ↩