Staring at a scratch on a pristine marine wall panel can be frustrating. It ruins the clean look of the cabin and can make a new vessel feel old. You need a reliable way to fix it without making it worse or undertaking a costly replacement.
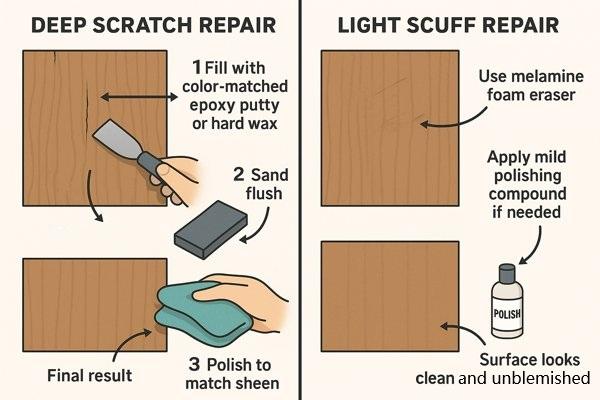
For deep scratches, the typical method is to fill them with a color-matched epoxy putty or hard wax, sand the area flush, and polish to match the sheen. For light scuffs, a simple melamine foam eraser or a mild polishing compound is usually sufficient to remove the mark.
I've been in the marine outfitting industry for years, from my early days in the factory to my time as a specialist at Magellan Marine. I've seen my fair share of scuffs and scratches on brand new panels. I remember a client from Indonesia, a sharp procurement officer, who was always focused on quality and price. She would meticulously inspect every panel, and a small scratch could be a big issue. This experience taught me the importance of having simple, effective repair techniques on hand. Let's walk through how to handle these imperfections.
How to Identify the Material of a Marine Wall Panel?
Wondering what your panel is made of? Identifying the material is the crucial first step before any repair. Using the wrong method can damage the panel further, turning a small scratch into a major headache. You need a clear way to know what you're working with.
First, check for a manufacturer's label. If none exists, inspect the panel's edge: a layered look indicates a composite panel. To tell HPL from PVC, HPL feels harder and more rigid, while PVC is lighter and has a more uniform, plastic-like appearance throughout its thickness.

Understanding the panel's composition is key to a successful repair. My clients, especially those managing large interior projects, rely on accurate material identification to maintain their quality standards. Let me break down the common types and add a few field tests.
Identifying Common Marine Panel Materials
When you're dealing with marine interiors, you'll most likely encounter one of these materials. Each has distinct characteristics that you can learn to recognize.
- High-Pressure Laminate (HPL)1: Known for its durability, HPL is made by fusing resin-saturated paper layers under high pressure.
- Field Test: Tapping an HPL surface produces a sharp, solid "tick" sound. It feels very dense. In an inconspicuous spot, a drop of acetone will not affect the surface quickly, showcasing its high chemical resistance.
- Polyvinyl Chloride (PVC) Film on a Substrate: This involves a PVC decorative film applied to a core like calcium silicate or vermiculite board.
- Field Test: The surface feels slightly softer than HPL and has more of a "plastic" look. Tapping it might produce a duller thud depending on the core material. Be careful with solvents, as acetone can quickly melt or mar the PVC film.
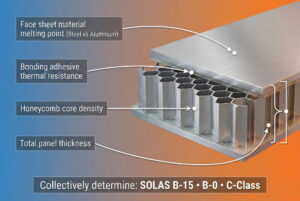
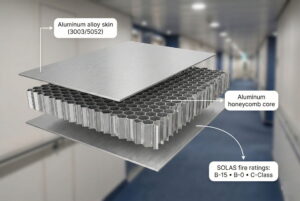
- Composite Panels: These are engineered for specific properties, most often fire resistance.
- Common Cores: The core is the key identifier. A rock wool core will have a fibrous, dense-mat appearance. An aluminum honeycomb core has a clear hexagonal structure. Other cores might include calcium silicate, a heavy, off-white, cement-like material.
- Face Sheets: The core is sandwiched between face sheets, which are often thin galvanized steel (you can test with a magnet) or aluminum, with the final decorative layer (like PVC film) on top.
Here is a simple table to help you differentiate:
| Feature | High-Pressure Laminate (HPL) | PVC Film on Board | Composite (e.g., Rock Wool Core) |
|---|---|---|---|
| Weight | Heavy, dense | Medium to heavy | Varies, but often very heavy |
| Edge Appearance | Solid, may show dark layers | Shows core material + film | Layered structure (skin, core, skin) |
| Tapping Sound | Sharp "tick" | Duller "thud" | Dull, solid sound |
| Solvent Test (Acetone) | High resistance, no immediate effect | Low resistance, will mar surface | Depends on face material |
Knowing these differences has helped me guide many clients. One procurement officer from an Indonesian firm was struggling to source panels that met both European quality standards and her budget. Identifying the right composite panel with a rock wool core and a durable PVC face was the solution that met the fire rating, durability, and cost requirements.
Does the Scratch Repair Method Differ for High-Gloss Versus Matte Finish Panels?
You've fixed a scratch, but now the repaired spot sticks out like a sore thumb. The sheen is all wrong. Repairing a high-gloss panel is different from a matte one, and getting it wrong can ruin the entire finish, drawing more attention to the area you tried to fix.
Yes, the repair method differs significantly. High-gloss finishes can be buffed and polished back to a reflective shine after filling a scratch. Matte finishes, however, must not be buffed or polished, as this will create a glossy spot. For matte panels, the repair must be perfectly leveled and textured.
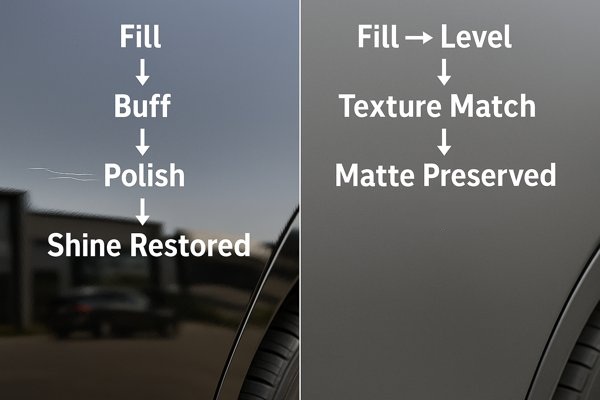
The finish of a panel is just as important as its color. This is all about how light reflects off a surface. A high-gloss surface is perfectly smooth, acting like a mirror. A matte surface is microscopically rough, scattering light in all directions to prevent reflections. Your repair technique must replicate one of these two effects. The table below provides a quick summary of the key differences for easy reference.
| Step | High-Gloss Finish Repair | Matte Finish Repair |
|---|---|---|
| 1. Filling | Fill slightly proud (overfill) to allow for sanding. | Fill precisely and level immediately, avoiding overfill. |
| 2. Leveling | Sand the cured filler perfectly flush using fine-grit sandpaper. | Scrape level while the filler is soft; avoid sanding the panel. |
| 3. Final Finish | Use cutting compounds and finishing polishes to restore shine. | Do Not Polish. If needed, gently dab to match texture. |
| Key Goal | A perfectly smooth, reflective surface. | A perfectly level fill that matches the non-reflective texture. |
Mastering the Final Sheen: Gloss vs. Matte Repairs
The goal is to make the repair invisible by matching the way the surrounding surface reflects light. Now, let's explore these points in more detail.
Repairing High-Gloss Panels
High-gloss surfaces are forgiving in one sense: you can work the surface to restore the shine.
- Fill and Level: After filling the scratch with epoxy and sanding it perfectly flush (progressing up to 1500 or 2000-grit wet sandpaper), the area will look dull. This is normal.
- Compounding: The first polishing step uses a cutting or rubbing compound. This is a more aggressive polish that removes the fine sanding scratches. Use a power buffer on a low-to-medium speed with a wool or firm foam pad.
- Polishing: Switch to a softer foam pad and a fine-grit finishing polish. This removes the swirl marks left by the compound and starts to build the deep gloss.
- Final Glaze (Optional): For a perfect finish, you can use a swirl remover or glaze product on a very soft foam pad. This final step enhances the clarity and shine, making the repair disappear.
Repairing Matte Finish Panels
With matte panels, the challenge is to fill the scratch without altering the light-scattering texture.
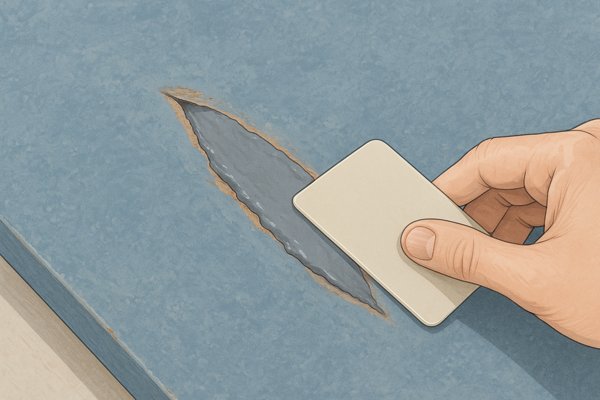
- Precise Filling: Use a matte-finish filler and apply it only within the scratch. Level it perfectly before it cures completely, using a plastic scraper. The goal is to avoid any sanding.
- Texture Matching: If the filled area is too smooth, you may need to recreate the matte texture. This is an advanced technique. You can try gently dabbing the semi-cured filler with a specific texture pad or a very fine abrasive sponge (like those used for painting prep). Always test your method on a sample piece first.
- No Polishing: Do not use any form of compound or polish. If you need to clean the area, use a dedicated matte finish cleaner that won't add any gloss or waxes to the surface.
What Tools Are Required for Repairing Marine Wall Panels?
Jumping into a repair without the right tools can lead to a messy, ineffective fix. You might think you can get by with what's on hand, but using the wrong applicator or abrasive can deepen the scratch or damage the surrounding area, making the problem worse.
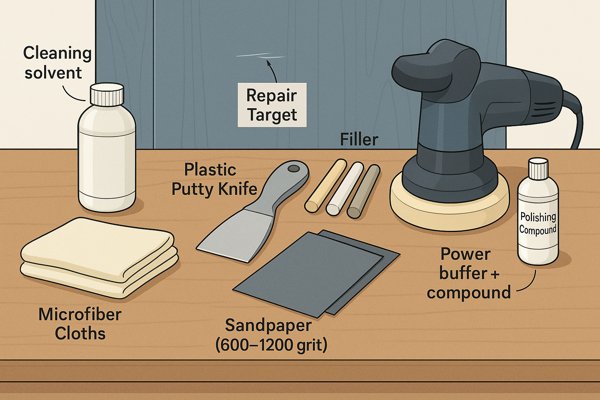
A basic repair kit requires a cleaning solvent, microfiber cloths, a plastic putty knife, and fine-grit sandpaper (600-1200 grit). You will also need a color-matched filler like epoxy putty or wax sticks. For high-gloss panels, a power buffer and polishing compound are essential for blending the repair.
When I help clients with technical issues, I always emphasize that having the right tools is half the battle. This table provides a quick overview of a comprehensive toolkit.
Overview of Recommended Repair Tools
| Tool / Supply | Purpose | Damage Level |
|---|---|---|
| Melamine Foam Eraser | Removing surface scuffs and material transfer. | Minor |
| Color-Matched Repair Markers | Hiding fine scratches without breaking the surface. | Minor |
| Soft Wax Filler Sticks | Filling small nicks and fine scratches. | Minor |
| Two-Part Epoxy Putty | Providing a hard, durable fill for deep gouges. | Major |
| Plastic Spreaders | Applying filler without scratching the panel surface. | Major |
| Sanding Block & Sandpaper | Leveling hardened filler and preparing the surface for finishing. | Major |
| Power Buffer & Compounds | Restoring the shine on high-gloss finishes after repair. | Major (Gloss) |
| Microfiber Cloths & Cleaner | Preparing the surface and final cleanup for all repair types. | Minor & Major |
Assembling a Panel Repair Toolkit
Having a dedicated kit for panel repairs can save you countless headaches. You don't need a massive toolbox, just a few specific items to handle the most common issues.
The Must-Haves
These are the core items you'll need for almost any scratch repair job.
- Cleaning Supplies:
- Microfiber Cloths: You need several clean cloths to avoid contaminating the repair area. They are soft and won't leave lint behind.
- Mild Solvent: Isopropyl alcohol or a specific panel cleaner is perfect for removing grease, oil, and dirt before you start. This ensures the filler adheres properly.
- Application Tools:
- Putty Knife or Plastic Spreader: A small, flexible spreader is essential for applying fillers smoothly and evenly into scratches. Plastic is often better as it's less likely to scratch the panel surface itself.
- Fillers:
- Color-Matched Repair Markers: Best for very minor surface scratches. They are a quick and easy solution.
- Wax Filler Sticks: These are great for small to medium scratches. They are melted into the scratch and then leveled.
- Epoxy Putty: For deeper gouges, a two-part epoxy filler provides a hard, durable repair. Look for kits that allow for color tinting.
For a Flawless Finish
These tools are for the crucial final steps that make a repair invisible.
- Abrasives:
- Fine-Grit Sandpaper: A selection of grits is important. You might use 600 or 800-grit for leveling a hard filler, followed by 1200-grit or even 2000-grit wet sandpaper to smooth the surface before polishing.
- Sanding Block: Using a block ensures you apply even pressure and keep the repaired surface flat.
- Polishing (for High-Gloss Only):
- Power Buffer: While you can polish by hand, a small orbital or rotary power buffer will give you a much more professional and consistent result.
- Foam Buffing Pads: Use a fresh, clean foam pad. Wool pads can be too aggressive and may scratch the panel surface.
- Polishing Compound: A fine or swirl-remover compound is what you need to bring back that high-gloss shine.
Building this simple kit has helped many of my clients feel more confident in managing their own interior maintenance.
How to Fix Light Surface Scuffs on a Marine Panel?
Light scuffs from luggage or equipment can make a new cabin look worn out. These marks are often just on the surface but are still very visible. You need a quick fix that doesn't involve sanding, filling, or complicated steps.
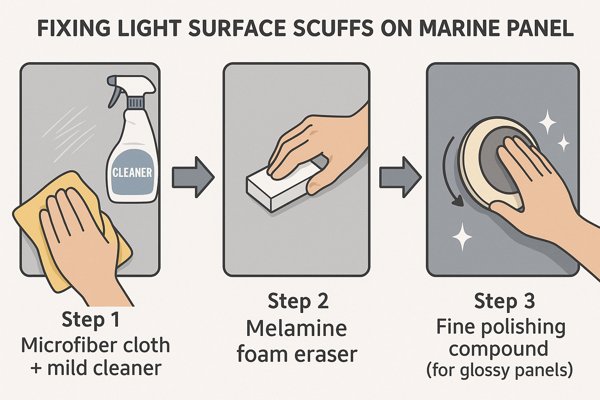
For light surface scuffs, start with the least aggressive method: a clean microfiber cloth and a mild cleaner. If that fails, a melamine foam eraser (like a Magic Eraser) often works wonders. For high-gloss panels, a fine polishing compound can also effectively buff out the scuff mark.
It's surprising how often a simple solution works best. A scuff is often just a transfer of material onto the panel's surface, not a true scratch. The key is to remove the transferred material without damaging the panel's finish. The following table provides a quick guide to the methods.
Quick Reference: Scuff Removal Methods
| Problem / Scuff Type | Recommended Method | Important Caution |
|---|---|---|
| Light Surface Marks | 1. Wipe with a damp microfiber cloth & mild soap. | Always start with the gentlest method first. |
| Stubborn Material Transfer | 2. Gently rub with a damp melamine foam eraser. | Test on a hidden area first to check for dulling. |
| Lingering Marks (Gloss Only) | 3. Hand-polish with a fine-grit polishing compound. | Do not use this method on matte or textured finishes. |
Step-by-Step Guide: Removing Light Scuffs
Here are the detailed steps for the methods above.
Method 1: The Gentle Clean
This should always be your first attempt.
- Prepare the Surface: Wipe the area with a dry microfiber cloth to remove any loose dust.
- Clean: Lightly dampen another microfiber cloth with a solution of warm water and a few drops of mild soap, or use a dedicated panel cleaner.
- Wipe: Gently rub the scuff mark in a circular motion. Sometimes, this is all it takes.
- Dry: Use a clean, dry cloth to wipe the area.
Method 2: The Melamine Foam Eraser
If cleaning doesn't work, this is your next best bet. These erasers work like super-fine sandpaper.
- Dampen the Eraser: Lightly wet a corner of the melamine foam eraser and squeeze out the excess water.
- Test: First, rub it on a hidden part of the panel to ensure it doesn't dull the finish. This is especially important for high-gloss surfaces.
- Erase: Gently rub the scuff mark with the damp eraser. Use minimal pressure. The mark should start to lift off.
- Wipe Clean: Wipe away any residue with a clean, damp cloth and then dry the area.
Method 3: Polishing (For High-Gloss Only)
This method is for stubborn scuffs on glossy panels.
- Apply Compound: Put a small amount of fine-cut polishing compound onto a microfiber cloth.
- Polish: Rub the scuff in a gentle, circular motion. The fine abrasives in the compound will remove the scuff without creating visible scratches.
- Buff: Once the scuff is gone, use a clean section of the cloth to buff the area to restore the shine.
Remember the golden rule: always start with the least aggressive method and work your way up only if necessary.
What Is the Best Filler for Deep Scratches or Gouges in Marine Panels?
A deep gouge is more than a cosmetic issue; it can compromise the panel's surface integrity. A simple wax stick won't do the job. You need a durable filler that will bond permanently, withstand the marine environment, and provide a solid base for finishing.
The best filler for deep scratches or gouges is a two-part epoxy putty. Epoxy fillers create a strong, permanent bond that is waterproof and resistant to chemicals. They cure to a hard, sandable finish, making them ideal for structural repairs on any panel type.
When a panel is deeply damaged, the repair needs to be as strong as the original material. While epoxy is the top choice, it's helpful to understand how it compares to other options.
Comparing Fillers for Deep Gouges
| Filler Type | Pros | Cons | Best For |
|---|---|---|---|
| Epoxy Putty | Extremely strong, waterproof, excellent adhesion, minimal shrinkage. | Slower cure time, requires precise mixing. | Deep gouges and structural repairs on any marine panel. |
| Polyester Filler | Cures very quickly, easy to sand. | Can shrink over time, stronger odor, less flexible than epoxy. | Fast, non-structural cosmetic repairs where speed is the priority. |
| UV-Cure Filler | Cures in seconds with a UV light, very clear finish. | Requires a special UV light, can be more expensive. | Small chips and scratches on high-gloss surfaces, especially in workshops. |
| Hard Wax Fillers | No mixing, easy to apply and color-match by blending sticks. | Not as durable as epoxy, can be damaged by heat or solvents. | Medium-depth scratches on decorative surfaces that won't see heavy wear. |
Application Tips for Epoxy
The marine environment affects how fillers cure.
- Temperature: Most epoxies have an ideal cure temperature range, typically 18-25°C (65-77°F). In colder conditions, the cure time can double or triple. You may need to use a heat lamp to warm the repair area.
- Humidity: High humidity can sometimes affect the surface finish of an epoxy, causing a cloudy or sticky film called "amine blush." This can be washed off with soap and water before sanding.
- Preparation is Key: For the best adhesion, slightly bevel the edges of the gouge with a utility knife. This increases the surface area and creates a mechanical lock for the epoxy, ensuring the repair never comes out.
For 99% of onboard repairs, a quality marine-grade two-part epoxy is the most reliable and permanent solution.
How to Color-Match a Repair to an Existing Wall Panel?
You've filled the scratch perfectly, but now you have a patch of the wrong color. An obvious color mismatch can look worse than the original scratch. You need a reliable method to blend the repair so it becomes invisible to the naked eye.
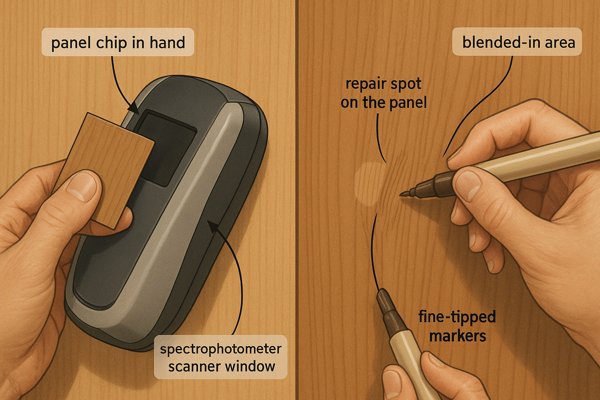
To color-match a repair, use a specialized color-mixing kit or take a small chip of the panel to a paint supplier with a spectrophotometer for an exact match. For wood grain or patterned panels, use a set of fine-tipped touch-up markers to replicate the pattern over the filled repair.
Getting the color right is an art, but there's also science involved. One major challenge is a phenomenon called metamerism, where colors appear to match under one type of light but look different in another. This checklist can help you achieve a perfect match.
Quick Reference: Color-Matching Steps
| Step | For Solid Colors | For Patterns / Wood Grains |
|---|---|---|
| 1. Create the Color | Take a sample chip to a paint store for a professional spectrophotometer match. | Use a repair kit with various tints to mix the lightest base color in the pattern. |
| 2. Test the Match | Test the dry paint under all lighting conditions (LED, daylight, etc.) to avoid metamerism. | Apply the base color to the repair and let it dry completely. |
| 3. Apply the Detail | Feather the edges of the paint to create a soft, invisible transition. | Use fine-tipped graining pens to lightly draw the pattern, layering colors as needed. |
| 4. Protect the Repair | Apply a clear top coat that precisely matches the panel's sheen (matte, satin, or gloss). | Apply a clear top coat to protect the artwork and match the surrounding sheen. |
Detailed Guide to Color-Matching a Repair
To avoid a poor match, you need to consider the lighting conditions.
For Solid Colors
- Get a Sample: Take a spare piece of the panel or a small chip from a hidden area to a professional paint supplier. They can use a spectrophotometer to create a custom paint formula that is spectrally matched, reducing the risk of metamerism.
- Test Under Different Lights: When you get your custom paint, or if you are mixing it yourself, test it on a sample card. Let it dry completely. Then, look at the sample next to the actual panel under every possible light source it will be exposed to: the main cabin lights, emergency lights, and natural daylight from a porthole. The color should look identical under all of them.
- Feather the Edges: When applying the paint, use a small artist's brush or a mini-roller to lightly "feather" the edges of the new paint onto the surrounding area. This creates a soft transition rather than a hard line, making the repair much harder to spot.
For Patterns and Wood Grains
This requires patience and an artistic touch.
- Identify the Layers: A wood grain pattern isn't just one color. It has a base color, grain line colors (often darker), and sometimes subtle highlights. Your repair must replicate these layers.
- Apply the Base: After filling and sanding, paint the entire repair with the lightest base color from the pattern and let it dry.
- Recreate the Grain: Use fine-tipped touch-up markers or a very fine artist's brush with a slightly darker color. Don't try to draw perfect, solid lines. Look at the existing grain—it's often broken and varied. Use short, light strokes. You can immediately soften a line by gently wiping it with a cloth dampened with alcohol. Build the pattern slowly.
Always apply a clear top coat or sealant after color-matching to protect the repair and match the panel's original sheen.
What Kind of Sealant Should Be Used After Repairing a Panel to Maintain Its Fire Rating?
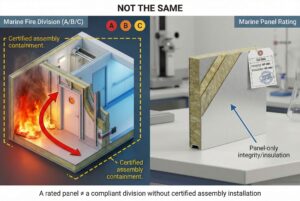
You've completed a beautiful repair, but have you compromised the panel's safety? Marine wall panels, especially on bulkheads, often have critical fire ratings (like B-15 or A-60). Using the wrong sealant can create a weak spot that will fail in a fire, voiding the panel's certification.
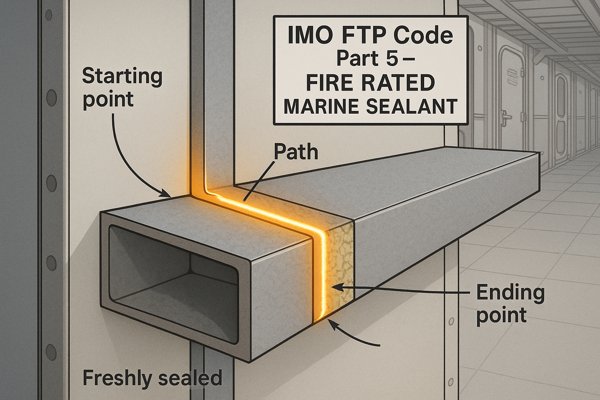
To maintain the fire rating, you must use a marine-grade, fire-retardant sealant that is certified to meet IMO (International Maritime Organization) standards. Look for products specifically labeled as "fire-rated marine sealant" or those compliant with IMO FTP Code Part 5.
Safety is non-negotiable at sea. To understand why the correct sealant is so critical, you need to understand what the fire ratings mean. These aren't just arbitrary labels; they represent specific performance standards in a fire.
Understanding Marine Fire Ratings and Sealants
| Class | Test Duration | Max Avg. Temp Rise (Unexposed Side) | Material Type | Common Location |
|---|---|---|---|---|
| B-15 Class | 30 minutes | 140°C after 15 minutes | Combustible core | Cabin-to-cabin walls |
| A-60 Class | 60 minutes | 140°C after 60 minutes | Steel or Aluminum | Stairwells, galley bulkheads |
As the table shows, a sealant used on an A-60 bulkhead must be able to withstand intense heat (over 900°C / 1700°F) for a full hour without failing. A standard silicone sealant would melt and burn away in seconds.
How to Choose and Verify a Sealant
- Check for "Wheelmark" Approval: For vessels under European flags, look for the MED "Wheelmark" logo on the product. This certifies that it complies with the Marine Equipment Directive and is approved for marine use.
- Read the Technical Data Sheet (TDS): The TDS is your most important document. It will explicitly state the product's fire rating (e.g., "Approved for A-60 bulkheads"), the required bead depth and width to achieve that rating, and the compatible substrates.
- Keep Records: For any fire-rated repair, it's good practice to take a photo of the sealant tube showing the certification marks and keep it with the ship's maintenance logs. This provides proof of compliance for surveyors and class societies.
Are All-in-One Repair Kits Available for Marine Wall Panels?
Searching for individual fillers, tints, and tools can be time-consuming and frustrating. You might buy the wrong type of putty or struggle to find the right colorants. You need a simple, integrated solution that has everything you need in one box to get the job done quickly.
Yes, all-in-one repair kits are available, though they are often marketed for laminate flooring or countertops rather than specifically for marine panels. These kits typically include wax filler sticks in various colors, a battery-operated melting tool, leveling tools, and applicators, which work perfectly for HPL and PVC marine panels.
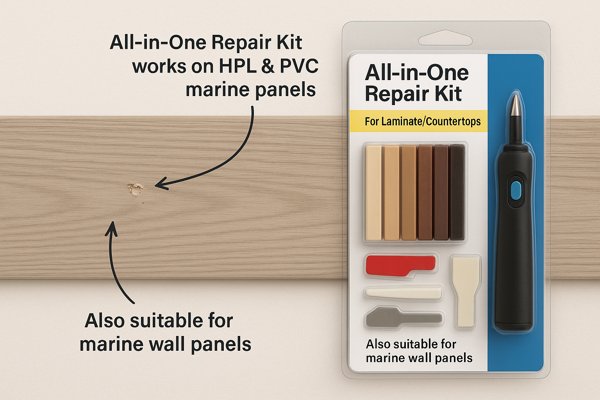
Efficiency is key on any marine project. These kits, from brands like Picobello, Fortivo, or Konig, offer a great balance of convenience and capability. However, it's worth weighing their pros and cons against buying professional-grade individual components.
All-in-One Kits vs. Professional Components
| Aspect | All-in-One Kits (Hard Wax) | Professional Components (Epoxy) |
|---|---|---|
| Convenience | Excellent: Everything you need is in one box. | Fair: Requires purchasing multiple items separately. |
| Speed | Excellent: Wax cools in seconds; repair is very fast. | Fair: Epoxy requires mixing and hours of cure time. |
| Durability | Good: Hard wax is durable for walls but can be damaged by heat/solvents. | Excellent: Epoxy creates a permanent, waterproof, structural bond. |
| Skill Level | Easy: Designed for DIY users with clear instructions. | Medium: Requires proper mixing, application, and sanding skills. |
| Best For | Quick, cosmetic repairs of small-to-medium scratches by crew members. | Deep gouges, damaged edges, and any repair requiring maximum durability. |
My advice to clients is often to have both. Equip the vessel's crew with a user-friendly hard wax kit for handling the inevitable minor dings and scratches quickly. Then, for more significant damage, have a small stock of professional epoxy, colorants, and finishing supplies for the maintenance team to perform permanent, high-quality repairs. This two-tiered approach ensures you have the right solution for every situation.
How to Prevent Future Scratches on High-Traffic Area Wall Panels?
Fixing scratches is one thing, but preventing them is even better. Corridors, entryways, and crew areas are constantly subject to wear and tear. Constant repairs are costly and time-consuming. You need a proactive strategy to protect these vulnerable surfaces from damage.
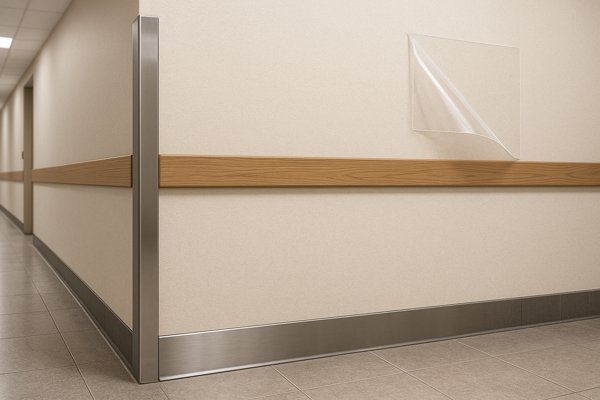
To prevent scratches, install protective hardware like stainless steel or rigid vinyl corner guards, chair rails, and kick plates in high-traffic areas. Applying a clear, heavy-duty sacrificial film or coating can also protect the original panel surface from scuffs and minor impacts.
I always advise clients to think about durability during the design and outfitting phase. A comprehensive protection strategy involves both physical hardware and smart operational procedures.
Overview of Scratch Prevention Strategies
| Strategy Type | Specific Method | Best For |
|---|---|---|
| Physical Hardware | Stainless Steel/Vinyl Corner Guards | Protecting vulnerable external corners from impact. |
| Physical Hardware | Chair Rails / Bumper Guards | Preventing damage from carts and furniture in corridors. |
| Physical Hardware | Kick Plates | Shielding the lowest part of walls and doors from scuffs. |
| Surface Protection | Sacrificial Clear Films | Guarding decorative surfaces against light scratches and scuffs. |
| Operational | Designated Routes for Carts | Minimizing traffic and potential impacts in narrow areas. |
| Operational | Temporary Protective Blankets | Protecting walls during maintenance, loading, or refits. |
Detailed Prevention Strategies
Protecting your wall panels involves creating physical barriers that absorb impacts and abrasion.
1. Install Robust Protective Hardware
This is the most effective method for preventing damage from impacts.
- Corner Guards: Choose Type 316L (low carbon) stainless steel for high-corrosion areas. For accommodation areas, high-impact colored vinyl can be used to blend with the decor.
- Chair Rails & Bumper Guards: These protect the middle of the wall. A "chair rail" is typically thinner and more decorative. A "bumper guard" or "rub rail" is thicker and more robust, designed to absorb impacts from trolleys and carts. Installing these at the point of impact is key—measure the height of your service carts.
- Kick Plates: A kick plate at the bottom of a door is standard, but extending this protection along the entire corridor wall in service areas can prevent countless scuffs. A height of 20-30 cm (8-12 inches) is effective.
2. Implement Smart Operational Procedures
Hardware can't protect everything. How the crew operates in a space is just as important.
- Designated Routes: Establish and clearly mark designated routes for moving heavy equipment, luggage, and supply carts. Use routes with wider corridors where possible.
- Temporary Protection: During maintenance, loading of stores, or passenger changeover, use temporary protection. This can be as simple as laying heavy-duty protective blankets (like mover's blankets) against the walls in key choke points.
- Crew Training: A brief training session on mindful movement in finished spaces can go a long way. Making the crew aware of the cost and effort of repairs encourages more careful behavior.
When Is a Panel Too Damaged for Repair and in Need of Full Replacement?
You're facing a badly damaged panel, and you're not sure if a repair is even possible. Attempting to fix extensive damage can be a waste of time and materials, resulting in a poor finish. You need clear criteria to decide when to cut your losses and replace the entire panel.
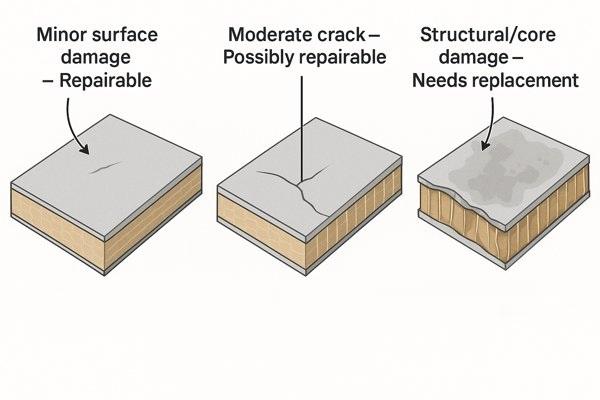
A panel needs full replacement when the damage is structural, such as when the core is crushed or delaminated, or when the surface damage covers more than 5-10% of the panel. Extensive heat or water damage that causes warping also typically requires replacement.
Knowing when to repair versus replace is a critical cost-management skill. The decision should be based on three factors: safety, quality, and cost. Here is a quick decision matrix, and we will explore the factors behind it in detail below.
Quick Reference: Repair vs. Replace Matrix
| Damage Type | Repair or Replace? | Primary Reason |
|---|---|---|
| Light scuffs, minor scratches | Repair | Cost/Time: Fast, cheap, and effective. |
| One deep gouge (<15 cm) | Repair | Quality: A localized epoxy repair can be made invisible. |
| Crushed core, delamination | Replace | Safety: Structural integrity and fire rating are compromised. |
| Multiple scratches over >10% of surface | Replace | Cost/Quality: High labor cost and likely a poor visual result. |
| Warping or swelling from water | Replace | Safety/Quality: Irreversible damage; panel is unstable. |
Key Factors for the Repair vs. Replace Decision
Here are the key factors to consider when assessing a damaged panel. If you answer "yes" to any of these questions, replacement is likely the better option.
1. Is the Core Integrity Compromised?
The core gives the panel its structural strength and fire-rating properties.
- Signs of Core Damage: Look for large dents where the panel is visibly pushed in. Tap the surface; a hollow or soft sound can indicate the core has been crushed or has detached from the face sheet (delamination).
- Why Repair Fails: You can fill the surface, but you can't restore the structural integrity or the fire rating of a compromised core. The panel will remain a weak point in the bulkhead.
2. Is the Damage Widespread?
Cosmetic repairs work best for localized issues.
- The 10% Rule: A good rule of thumb is if there are numerous deep scratches, gouges, or areas of discoloration covering more than 10% of the panel's surface area, a repair will be patchy and noticeable.
- Why Repair Fails: Achieving a consistent color and finish over a large, repaired area is extremely difficult. The time and labor involved will quickly approach the cost of a new panel.
3. Is there Warping or Water Damage?
Marine environments are tough, and sometimes panels fail due to moisture.
- Signs of Damage: Look for visible bowing or warping of the panel. Swelling, especially around the edges, is a clear sign that water has penetrated the core.
- Why Repair Fails: A warped panel cannot be flattened. The water damage has permanently altered the structure of the core materials. The only solution is replacement.
My rule of thumb that I shared with my Indonesian client is simple: If the estimated repair cost (labor + materials) exceeds 50% of the total replacement cost, always replace.
What Are the Most Durable and Scratch-Resistant Marine Wall Panel Options?
You are planning a new build or a major refit and want to minimize future maintenance. Choosing the right panel from the start can save you years of headaches with scratches and repairs. You need to know which materials offer the best combination of durability, aesthetics, and compliance.
The most durable and scratch-resistant marine wall panels are typically High-Pressure Laminate (HPL) panels, especially those with an aluminum oxide overlay. For a modern aesthetic with high durability, compact laminate and coated aluminum composite panels are also excellent choices.
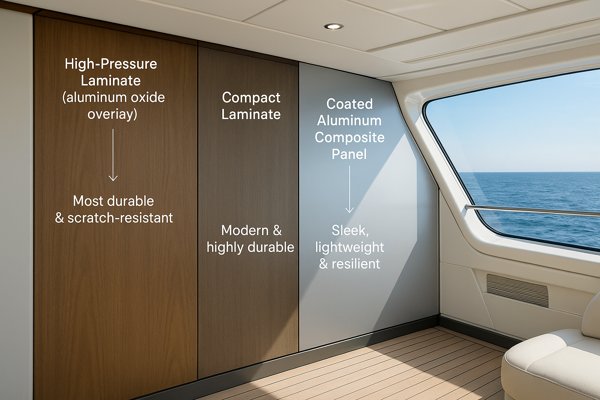
When specifying panels, looking at their performance on standardized tests gives you objective data. The NEMA LD-3 standard2, for example, tests the wear resistance of laminates by seeing how many cycles of an abrasive wheel it takes to wear through the decorative layer. A standard laminate might last 400 cycles, while a high-wear HPL can exceed 1,000 cycles. Below is a summary table, followed by a detailed breakdown of each option.
Comparison of Durable Marine Panel Options
Here’s a comparison of the top three choices for high-traffic marine environments. Ratings are on a scale of 1 (Low) to 5 (High).
| Feature | High-Pressure Laminate (HPL) | Solid Compact Laminate | Coated Metal Composite |
|---|---|---|---|
| Scratch Resistance | 5 (With aluminum oxide overlay, it's extremely hard.) | 5 (Same durable surface as HPL but on a solid core.) | 4 (Powder coats are tough, but a sharp point can scratch them.) |
| Impact Resistance | 4 (Resists dents well, but extreme impact can crack the substrate.) | 5 (Extremely dense and solid, very hard to damage.) | 4 (Resists dents well, metal substrate is strong.) |
| Weight | 3 (Moderately heavy.) | 2 (Very heavy and dense.) | 5 (Often made with aluminum honeycomb cores, very light.) |
| Cost | 4 (Cost-effective and widely available.) | 2 (Premium product, significantly more expensive.) | 3 (Mid-range, depends on core and finish.) |
| Aesthetic Flexibility | 5 (Thousands of colors, patterns, and textures available.) | 4 (Wide range of colors, but fewer options than standard HPL.) | 3 (Typically solid colors or metallic finishes.) |
| Best For | Cabin walls, furniture, doors—the all-around standard. | High-impact walls, countertops, and wet units like bathrooms. | Galleys, service corridors, and modern, high-tech interiors. |
Detailed Breakdown of Durable Panel Types
When we talk about durability in marine panels, we are primarily looking at the surface's ability to resist abrasion and impact.
1. High-Pressure Laminate (HPL)
HPL is the industry workhorse for a reason.
- Scratch Resistance: The top layer of an HPL panel is a melamine resin-impregnated decorative sheet, often with an additional clear overlay containing aluminum oxide—one of the hardest materials known. According to ISO 4586 standards3, a quality HPL should be able to withstand a force of up to 4 Newtons from a diamond-tipped stylus without scratching. This makes it highly resistant to everyday wear and tear.
- Impact Resistance: HPL can withstand significant impact, which is why it's used for countertops and furniture as well as walls.
- Variety: It comes in thousands of colors and patterns, including realistic wood grains and stones.
2. Compact Laminate
This is essentially a thicker, solid version of HPL.
- Construction: It's made of multiple layers of kraft paper saturated with resin and fused under high pressure, but it's much thicker (typically 6mm to 13mm) and doesn't require a substrate.
- Extreme Durability: It has all the scratch-resistant benefits of HPL but is even more resistant to impact and is completely waterproof, making it ideal for wet units and other demanding areas.
3. Coated Aluminum or Steel Panels
For a sleek, modern look, metal-faced panels are a great option.
- Surface Coating: These panels use a thin sheet of aluminum or steel as the face material. The durability comes from the factory-applied coating, which is often a robust powder coat or a PVDF (Polyvinylidene Fluoride) finish.
- Performance: These coatings are hard, resistant to chemicals, and easy to clean. While a very sharp object can scratch the paint, the metal substrate is highly resistant to dents and impacts. They are often used in galley and service areas for their hygienic properties.
For the best long-term value, my recommendation is often a hybrid approach: use standard, cost-effective HPL panels in private cabins and low-traffic areas, and invest in more durable options like compact laminate or metal composites for corridors, stairwells, and service areas. This targeted approach balances budget with lifecycle cost.
Conclusion
In summary, repairing scratches on marine wall panels is entirely manageable with the right knowledge and tools. Identify the panel material, use the correct filler, and always tailor your finishing technique to the panel's high-gloss or matte surface.
-
Explore the advantages of HPL for marine interiors, including its durability and chemical resistance. ↩
-
Understanding the NEMA LD-3 standard can help you choose durable laminates for your projects. ↩
-
Learn how ISO 4586 standards ensure the durability and quality of HPL surfaces, helping you make informed choices for your projects. ↩