You have likely faced the nightmare of importing marine doors from Asia only to have them fail final inspection in Europe because the closing action was not smooth. Ensuring the mechanism works perfectly is the only way to protect your profit margin and avoid costly replacements.
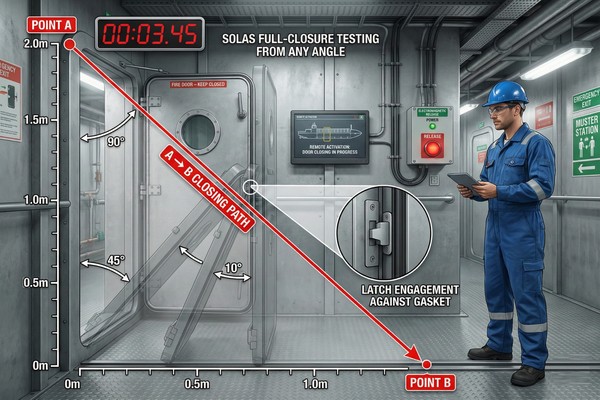
Testing marine fire door closing mechanisms requires a comprehensive approach covering SOLAS II-2 regulations, which includes measuring closing speed (typically 0.1 to 0.2 m/s), verifying latch engagement against seal pressure, testing electromagnetic release systems from both local and central control panels, and ensuring the door closes fully from any open angle up to 90 degrees.
Testing these mechanisms is not just about opening and shutting the door. It is a strict technical process. If you miss one step, the Class Society surveyor will reject the installation.
What are the SOLAS standards for marine fire door self-closing requirements?
Inspecting doors without understanding the specific regulations is a waste of your time and money. You must know exactly what the surveyor looks for when they step onto the ship.
The International Maritime Organization (IMO) SOLAS Chapter II-2 Regulation 9 mandates that all fire doors in main vertical zones must be self-closing. This requires testing adherence to the Fire Test Procedures (FTP) Code, ensuring doors close from an aperture of 60 degrees and resist holding back hooks not linked to the central control system.

Analyzing SOLAS A-Class vs B-Class Closing Differences
When you check products from suppliers in China or Vietnam, you must verify that the self-closing nature matches the specific class of the door. An A-60 door is heavy. It often weighs over 80kg. A B-15 door is lighter, around 30-40kg. The testing standard for the closing mechanism differs because of this mass.
For A-Class doors, the mechanism must have enough power to compress a thick intumescent seal (often 4mm thick). If the door closes but does not compress the seal, it fails. You must test that the door operates effectively against an inclination of 3.5 degrees. This simulates the ship rolling at sea. Many cheap door closers work on flat ground in the factory but fail when the frame is tilted. You need to ask your supplier to demonstrate this tilt test. If the closer is too weak (e.g., a size 2 closer on a 100kg door), it will stall before latching.
| Door Class | Typical Weight Range | Required Closing Force | Seal Compression Requirement |
|---|---|---|---|
| A-60 Fire Door | 80kg - 120kg | > 60N (Newton) | High (Must compress 2-3mm seal) |
| B-15 Fire Door | 30kg - 45kg | > 30N (Newton) | Medium (Must compress 1mm seal) |
| C-Class Door | 20kg - 30kg | Self-closing not always mandatory | Low |
| A-0 Watertight | > 150kg | Hydraulic assist required | Very High (Rubber packing compression) |
Verifying Wheelmark Certification Validity
Physical testing is only half the battle. You must check the paperwork. The door closer itself must be Type Approved. It should carry the "Wheelmark" (MED certification) if the ship is for a European owner.
I often see suppliers attach a generic "fire door closer" that costs $15. These often lack the proper fire rating certificates. You must check the data plate on the closer arm. It must match the certificate provided in the shipping documents (Module B and D). If the certificate says model "TS-68" but the installed unit is a copycat with no name, the surveyor will refuse it. You must demand the test report that proves that specific closer model was tested with that specific door leaf. The certificate validity is usually 5 years; ensure it has not expired before the keel laying date.
How to measure closing speed and force accurately?
If a door slams too hard, it can injure a crew member; if it closes too softly, it will not latch. Finding the balance between these two extremes is critical for acceptance.
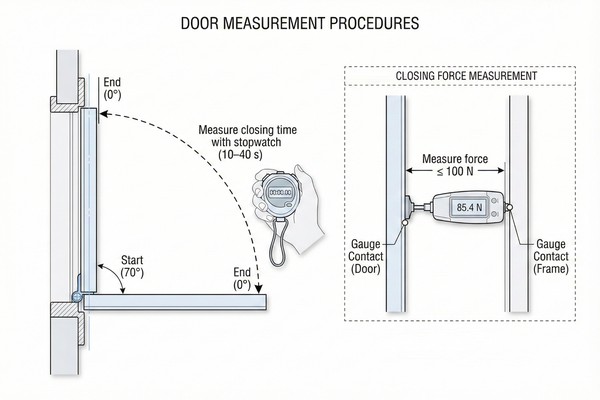
Testing involves using a stopwatch and force gauge to ensure the door closes within the SOLAS mandated range, typically no more than 40 seconds and no less than 10 seconds. The closing force must not exceed 100N to prevent injury while maintaining enough momentum to overcome the latch resistance.
Optimizing Closing Time for Safety Compliance
You need to test the closing time from a fully open position, which is usually 90 degrees. The International Association of Classification Societies (IACS) unified interpretations suggest a closing time between 10 and 40 seconds.
If the door closes in 5 seconds, it is dangerous. It acts like a guillotine. If it takes 50 seconds, smoke could pass through before it shuts. To test this, you open the door to 90 degrees, release it, and start your stopwatch. You stop the watch when the latch clicks. You must repeat this test 3 times. If the times vary by more than 2-3 seconds, the hydraulic fluid1 in the closer might be low or of poor quality. This is common in cheap units where the oil viscosity changes with temperature. Consistent timing indicates a healthy hydraulic cylinder.
| Opening Angle | Acceptable Time Range | Action if Too Fast | Action if Too Slow |
|---|---|---|---|
| 90 Degrees | 10s - 40s | Tighten "Sweep" valve | Loosen "Sweep" valve |
| 20 Degrees (Latching) | Last 2 seconds | Tighten "Latch" valve | Loosen "Latch" valve |
| 0 Degrees (Closed) | N/A | Check lock strike plate | Check seal friction |
Calibrating "Backcheck" and "Latching" Valves
Most standard closers have two valves, but high-quality marine closers often have a third: the "Backcheck" (BC). This is vital for external doors exposed to wind.
The Sweep valve controls the main swing (90° to 20°). The Latching valve controls the final snap (20° to 0°). The Backcheck creates resistance when opening past 70°, preventing the wind from ripping the door open and damaging the hinges. To test the Latching valve, you must ensure the final 20 degrees has enough force to push the latch bolt into the striker against the rubber seal resistance. However, do not over-tighten the spring tension. If the opening force exceeds 100 Newtons, the crew will complain, and it violates safety standards for accessibility. You need a standard push-pull force gauge to verify this.
How to verify latch engagement and seal compression?
A closed door that is not fully latched is useless in a fire event. The latch must click shut securely every single time, regardless of air pressure differences.
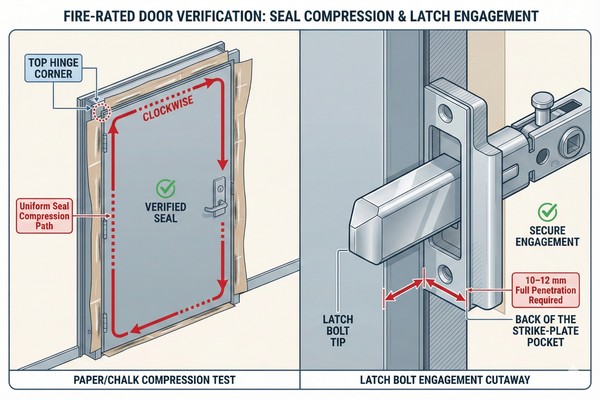
Verification requires a "paper test" or chalk test to confirm the intumescent seal compresses uniformly around the frame when latched. The latch bolt must fully penetrate the strike plate by at least 10-12mm, ensuring the door remains closed under positive pressure during a fire event.
Executing the Paper Test for Seal Integrity
This is the cheapest and most effective test you can do in a factory in Asia. You do not need expensive equipment. You take a piece of standard A4 paper (approx. 0.1mm thick). You place it between the door leaf and the frame. Then, you let the door close and latch.
Once the door is latched, try to pull the paper out. If the paper slides out easily without tearing, the seal is too loose. Smoke will get through. If the paper is stuck firm or tears, the seal is good. You must perform this test at the top, middle, and bottom of the door edge. I often find that the top corner of the door frame is bent slightly during welding, causing a gap. This test reveals that defect immediately. For watertight doors, you might use a "chalk test" where you chalk the rubber and check for a continuous line on the compression bar, but for fire doors, the paper test is standard.
| Test Location | Expected Result | Common Defect Cause | Fix |
|---|---|---|---|
| Top Corner (Hinge Side) | Paper tears when pulled | Hinge misalignment | Adjust hinge shim |
| Middle (Lock Side) | Paper stuck firm | Strike plate wear | Replace strike plate |
| Bottom Corner | Paper slides out | Door leaf twisted | Re-install door leaf |
| Threshold | Paper touches lightly | Drop seal failure | Adjust drop seal screw |
Measuring Gap Tolerances with Feeler Gauges
While the paper test is good for seal compression, you need a feeler gauge2 to check the physical clearances. The gap between the door leaf and the frame (the jamb) is critical for fire integrity.
For most A-60 doors, the maximum allowable gap is usually 3mm to 4mm. If the gap is 5mm or more, the latch bolt barely touches the strike plate. In a fire, the metal expands and warps. A 5mm gap can easily become 10mm, causing the door to pop open. You must insert a stepped feeler gauge along the lock side. If you can slide a 4mm gauge freely into the gap while the door is latched, the installation is rejected. You must also check the "throw" of the latch bolt. It must extend at least 12mm into the frame. Mark the bolt with lipstick, close it, open it, and measure the lipstick mark depth inside the strike plate.
How to test electromagnetic release and central control systems?
High-end decoration projects for cruise ships or ferries often use magnetic hold-backs. These keep the door open for traffic but must release instantly when the alarm triggers.
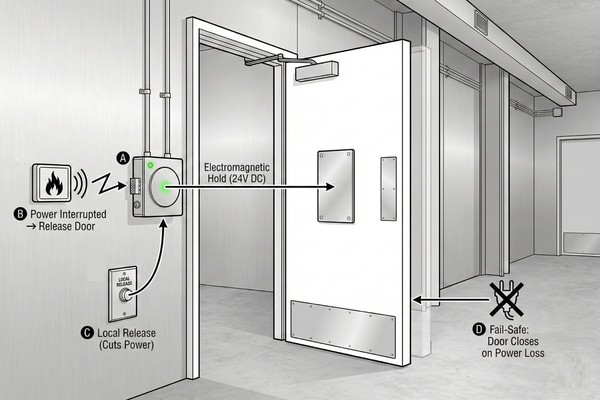
Testing electromagnetic holders involves interrupting the 24V DC power supply to simulate a fire alarm, confirming the door releases immediately from a 90-degree hold-open position. This includes checking the local release button functionality and verifying the fail-safe release upon total power loss.
Validating 24V DC Fail-Safe Functionality
Electromagnetic door holders are "fail-safe." This means they need power to hold the door. If power is cut, they must let go. The standard voltage is 24V DC.
To test this, you should have the door held open by the magnet. Then, find the local release button (usually a red button near the floor). Press it. The door should release instantly and swing shut under the power of the hydraulic closer. If there is a delay of more than 1 second, there is a problem with residual magnetism. This happens when cheap iron is used in the magnet core. You must also simulate a full power outage at the main panel to ensure all doors in the zone close simultaneously. A multimeter should be used to verify the voltage drop at the magnet terminals to 0V when the alarm is active.
| Component | Test Action | Acceptable Outcome | Failure Sign |
|---|---|---|---|
| Magnet Face | Inspect visually | Clean, flat surface | Rust or paint buildup |
| Armature Plate | Wiggle test | Slight movement (floating) | Rigid/Fixed tight |
| Holding Force | Pull door manually | Releases with 20-50kg force | Cannot pull open |
| Voltage Input | Measure with Multimeter | 24V DC (+/- 10%) | < 20V (Weak hold) |
Troubleshooting Armature Plate Alignment
The angle between the wall magnet and the door plate is critical. The armature plate on the door is usually adjustable or "floating." It needs to be perfectly parallel to the magnet face when the door is open.
If the door is set to open at 85 degrees but the magnet is mounted for 90 degrees, the contact is weak. You test this by opening the door to the magnet. If it does not "grab" immediately, do not force it. Check the angle. I often use a swivel-mount armature plate for my clients. This type allows the plate to pivot and find the best contact area with the magnet. This reduces the chance of the door accidentally closing when the ship vibrates. Poor alignment causes the coil to overheat and eventually burn out, leading to warranty claims.
How to diagnose common failure modes in closing mechanisms?
Even with the best testing, things go wrong. Identifying whether the fault lies in the hydraulic unit, the hinge installation, or the door frame geometry is essential for quick repairs.
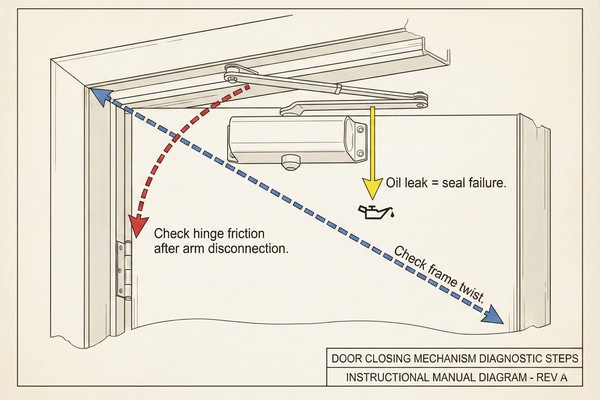
Diagnosis involves isolating the variable by disconnecting the closer arm to check hinge friction, inspecting the hydraulic unit for oil leaks indicating seal failure, and measuring frame squareness to rule out structural twisting. This systematic isolation prevents replacing expensive closers when a simple hinge adjustment is required.
Distinguishing Between Hinge Binding and Closer Failure
When a door fails to close, 80% of people blame the hydraulic closer. However, 80% of the time, the problem is actually the hinges. You need to perform an "Isolation Test."
Disconnect the closer arm from the door leaf. Now, push the door with your finger. It should swing freely with almost zero resistance. If the door feels heavy, stiff, or squeaks, the hinges are misaligned or the grease has dried out. This is called "hinge binding." No amount of adjusting the hydraulic closer will fix a binding hinge; you will only blow the seals by increasing the pressure. If the door swings freely but still won't close when connected, only then is the hydraulic unit the culprit.
| Symptom | Likely Cause | Verification Method | Corrective Action |
|---|---|---|---|
| Door slams shut | Fluid leak / Valve loose | Check floor for oil drops | Replace Closer Unit |
| Door stops halfway | Hinge Binding | Disconnect arm & swing | Re-align / Grease Hinges |
| Door bounces back | Air in cylinder | Repeated full open/close | Cycle door 10x to bleed air |
| Grinding noise | Broken internal spring | Listen near closer body | Replace Closer Unit |
Identifying Hydraulic Fluid Leakage Signs
Hydraulic closers use viscous oil to dampen the spring force. If this oil leaks, you lose control of the door speed.
You must inspect the pinion shaft (where the arm connects to the body) and the adjustment screws. Run your finger under the closer body. If you find fresh oil, the internal O-rings have failed. This is common in tropical climates like Indonesia or Vietnam if the supplier used cheap rubber seals that degrade in heat. Once a closer leaks, it cannot be refilled; it is a sealed unit. It must be replaced immediately. A leaking closer will eventually cause the door to slam violently, which can damage the bulkhead structure or hurt a passenger.
Conclusion
To ensure your marine fire doors pass inspection, you must rigorously test the closing speed (10-40s), verify the latch depth (12mm) and gap tolerances (<4mm), and isolate hinge binding from hydraulic failure.